Know a little something about maintenance, fixing, tuning, or modifying adventure dual sport motorcycles? Or, maybe you have mad skills riding or racing them? Whatever the case, if you have valuable knowledge & experiences that relates to adventure dual sport motorcycles, please help your fellow riders by sharing your best tips, tricks, and how to articles.
Not too fond of washing your bike with a pressure washer (seal issues), but getting mud off your bike without one can be a lot of work?
Try hooking up your garden hose to your home hot water heater. The hot water releases the mud from my bike quickly without the high pressure that isn't kind to bearings & seals.
They aren’t sexy…but behind the scenes steering stabilizers aid in handling and can help keep you out of trouble when putting the hammer down.
Let’s look at how and why steering stabilizers work and some available options for off-road machines. We spoke to industry experts as well as enduro, motocross and desert riders and racers to get a good idea of why they feel stabilizers can be a necessary bolt-on.
Who makes them?
Fastway, GPR, Scotts, RTT and W.E.R. are covered here, and are among the leading manufacturers. They all have pros and cons and vary in some way so it’s important to read up and make the right decision.
What do they do?
Simply put, steering stabilizers are hydraulic dampers for the front suspension. They help control stress loads that can overcome both the front fork and the rider’s ability to control the steering.
Think of it like this…if you’re riding and you hit a big, sharp edged rock or root…your handlebars want to turn very quickly to compensate, sometimes wresting the bars out of your hands...leading to a yard sale or worse. The steering stabilizer can make that situation manageable by dramatically slowing down the speed at which the bars deflect, thereby affording you time to react and not lose (as much) control.
Steering stabilizers can also effectively minimize the “head shake” effect we all dread at higher speeds and contribute to less wasted movement extending ride time before onset of fatigue.
When talking with Drew Smith at W.E.R. he put it this way; “The W.E.R. steering damper is a rotary hydraulic device, and the nature of a hydraulic damper is to resist very little when moved slowly and resist much more when a deflecting blow drives the wheel off line. Dampers reduce fatigue and are very helpful in rocky and route technical terrain.”
He continued; “When using a damper for off road, keep in mind that more is not always better. If the damper adjustment is too firm the bike will have a swimming feel…you’ll feel your hands are always busy on the bars and you’ll be wasting energy in technical terrain…and saving energy is what a damper should be doing for riders.”
What do they cost?
These units aren’t cheap, but also not out of reach when you look at the price of a full exhaust or a new helmet. This market is a competitive one, with all costing approximately $400 - $500. Do your homework because depending on your stabilizer, as you made need certain adaptors, mounting plates and/or clamps to make it all work on your specific machine.
Is installation simple?
Some units are installed under the center point of the handlebars. This presents issues on many off-road bikes as they are designed to accept such additional hardware, but each maker has devised a way for this to be a fairly straightforward by making kits to keep the installation as simple as possible.
For example, Scotts offers bolt-on mounting kits that include items like bar riser(s), link arm, handlebar clamp and frame bracket and even items like integral handguards that they claim reduces installation time to under an hour. They also offer under/over handlebar options as well.
Scotts commented that “Most installations are very easy and can be installed by the home mechanic with basic tools. We provide a detailed set of instructions with color pictures specific to the customer’s bike the damper is being installed on.”
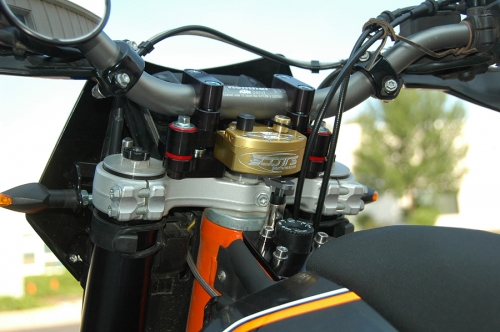
Photo: Scotts SUB Stabilizer Installed
They continued; “On most models of bike we offer fitment on top of the handle bars or SUB mounted underneath the handle bars which will normally raise the bars up 25mm in height. For many bikes that have bars that are solid mounted to the triple clamps we also offer a SUB mount that adds rubber mounting to the bars to help eliminate vibration and harshness on your hands or wrists. Since the off road industry is dominated by KTM currently we do sell more KTM units than anything else and slightly more rubber SUB mounts than anything else.”
Raising your bars can drastically alter your riding position and to address this, GPR has cleverly devised a very low profile damper that allows for only a very slight rise in location by moving the adjustment dial to the left side and creating a dial that was easy to use but as small as possible, coupled with the creation of a "hollow" vane. The hollow vane allows for the damper to be mounted almost flush to the top clamp.
Fastway has another take on this issue and offers both an underbar and overbar mounting kit…and this expands the mounting options drastically. The underbar kit provides some great protection for the stabilizer itself and because the Fastway units have “on the fly” adjustability and you’ll want it to be as easy to reach as possible. Fastway also offers KTM and Suzuki frame clamps which are two-piece which they claim “makes installation a breeze. No need to remove the front end of the bike – which is a challenge specifically on the KTM.”
Photo: Fastway Stabilizer Installed
To eliminate the raised bar issue completely, W.E.R. stays off the top triple clamp and attaches their damper to the lower triple clamp via the frame, and claims that it does “not interfere with handlebars, controls or time keeping equipment.” You can see the obvious advantages to this type of mounting system just by seeing the units installed and you barely notice the unit is there.
W.E.R. continued; “The installation of the W.E.R. damper is in most cases easy, with a frame bracket attached to the frame by pop rivets or a bolt going through the frame gusseting from one side to the other. The damper itself attaches to the fender bolt pattern via a plate between the fender and the lower triple clamp, our location is unique and is out of the rider’s way.”
Photo: W.E.R. Stabilizer Installed
How does the rider control the damping?
One important thing to keep in mind when examining these units is their “on the fly” adjustability, which is offered by all in one way or another. Many riders we spoke to actually “set it and forget it” when using these products.
But as we talked to more serious racers who ride on more varied terrain (such as enduro or desert) they liked the instant adjustment of the damper and consider it to be a feature they wouldn’t do without. We don’t believe that many novice riders would be able to correctly use this feature without practice in a racing environment.
Photo: Scotts Adjustments are by Two Knobs
This feature is usually done by a dial on the handlebar-mounted unit, like the Scotts product that provides “on the fly” adjustment - whereby the damping can be adjusted while riding with two knobs for adjusting high and low speed circuits.
Scotts had this to say about adjusting their unit; “Keep in mind that, much like your fork and shock, you will run different settings for different extremes of riding. Most riders will find a setting that works for the type of riding they do and not have to adjust the damper from there, but if you moto one weekend and hit the salt flats the next you will run the damper adjustments differently.”
This adjustment capability is also a feature offered on the GPR V4 dampers, with the V4 featuring an ultra low-profile dial on the damper itself. GPR states; “The knob assembly rotates 360 degrees left or right allowing you to go straight from the softest setting to the hardest setting, if need be. It will not unload, unscrew, or pop out, disabling your damper unit. The lower the number, the softer the setting. The higher the number the harder the setting.”
Photo: GPR V4 Dirt Stabilizer with Low Profile Dial
The Fastway units boast the most adjustability in this segment with two models for adjustability of the damping features. First up is the System 3 which offers three fully adjustable circuits: high speed, low speed, and return to center. Next up in the Fastway lineup is the System 5 which offers five independently adjustable circuits: high speeds, low speed, return to center, cornering damping and cornering angle.
Fastway had this to say about their two distinct stabilizers; “If you are the guy that is constantly playing with his suspension (clickers) and or making adjustments to your machine, we recommend the System 5. In addition, if you are doing a very wide variety of riding (like yourself) we also recommend the 5. The System 5 is sweet because you can go through a mile of sand whoops with your low speed cranked up and hit a 180 onto some tight single track and have the best of both worlds. The cornering angle allows you the ability of running a higher low speed setting while retaining the quicker steering ability of the low speed cranked all the way down. Then once you hit the next mile of sand whoops, you don't need to adjust your low speed back up.”
Photo: Fastway System 5 Stabilizer Adjustments
The RTT damper is different in the way you adjust it, it uses a remote valve on the handlebar and they claim “The seven position adjustment knob is coupled with a three level remote valve allowing for precise dampening...”
Last up is the W.E.R. unit, which offers adjustability on the unit itself. The damper is installed on the lower triple clamp and the adjustment knob is on the unit itself, therefore “on the fly” adjustments are not possible.
What do they weigh?
Damper weight and associated mounting hardware can range from approx. 2-4 lbs in total…and the higher up you carry this weight, the more detrimental it can be so this is always a concern.
Do they wear out?
Yes dampers can (and do) wear out and most companies mentioned here offer a low-cost mail-in rebuild service. Scotts says; “The damper itself can be a lifetime investment with simple maintenance and will follow you from bike to bike with just buying the new mount for your new bike.”
Should I get one?
In our experience and when talking to off road riders, it seems to depend more on where you ride than how you ride when deciding on a steering stabilizer.
We spoke to the folks at Scotts and they said; “The damper will apply itself for any type of riding you do and is adjustable so the same unit will work for the Baja rider doing fast, high speed riding to the woods rider doing tight, twisty riding.”
We then talked to the folks at Fastway who offered: “Desert riders enjoy added insurance with the highly adjustable high speed dampening capabilities. This will reduce headshake/shimmy and if you have a high-speed impact such as a root and rock, the assistance of the stabilizer can even prevent some types of crashes. In addition, the high-speed damping circuit reduces the force of impacts through the bars to help reduce rider fatigue and keep the vehicle going in a straight line.”
For Motocross; “Stabilizers reduce headshake and fatigue, allowing riders to loosen grip on handlebar allowing you to ride more with their legs. There is a noticeable difference in cornering and the stabilizer will help/assist in holding the line. And for Adventure bikes, they reduce fatigue by allowing riders to loosen their grip.
In regards to Enduro, Fastway offered: Corning angle controls give riders the option to run a high amount of low speed dampening without slowing down steering in the tight sections. This adjustment controls resistance level when the handlebars are turned into the “cornering” range as set by the sweep adjustment. Basically, cornering or sweep adjustment establishes the “range” of protection, left to right, that you want. When the damper “breaks to free” this Cornering Damping level adjusts “how much” it breaks away.”
We then spoke to both motocross and enduro riders who were in different camps. Talking to casual and serious motocross riders, the stabilizer seemed to be regarded as unnecessary on smooth MX tracks as the lack of sharp edged obstacles coupled with the additional price/weight tradeoff just wasn’t worth it. Some weren’t even aware that their motorcycle had one installed from the factory (like the Honda CRF250 and 450).
But when we spoke to enduro and even casual vet woods riders, they all seemed feel it was a helpful item and the cost and weight tradeoff was absolutely worth it. Many commented on the fatigue reduction aspect and felt they could ride longer and faster with the steering stabilizer, but many confessed to not utilizing the on the fly” adjustments after they began their riding day unless the terrain changed radically.
Desert riders and racers also swore by the units, calling it a “must have”, especially as the speeds increased. Most felt there was an appreciable reduction in high speed headshake as well as protection against unforeseen obstacles hit at lower speeds.
In Conclusion
Steering stabilizers offer lot of adjustability and light weight in a small package that can improve handling and your bike control at an affordable cost. If you ride motocross you may feel you might not need a steering stabilizer…but you probably could use one. If the factory is installing these units on the new bikes there is probably a good reason, and soon you may already have one installed when they build your new bike.
If you ride desert, enduro or woods these units are a no-brainer. Just one crash due to unforeseen obstacles can wreck you and your equipment causing major damage or even worse, depending on the speed. The adjustability and control offered is valuable and can be exploited to achieve higher speeds and less fatigue while featuring a built-in safety measure that can save you from machine damage and injury.
Resources:
Fastway - ProMoto Billet
GPR Stabilizers
RTT Motorsports
Scotts Performance Products
Works Enduro Rider (W.E.R.)
Written by Sean Goulart, Sr. Contributing Editor XLADV.com and ThumperTalk.com
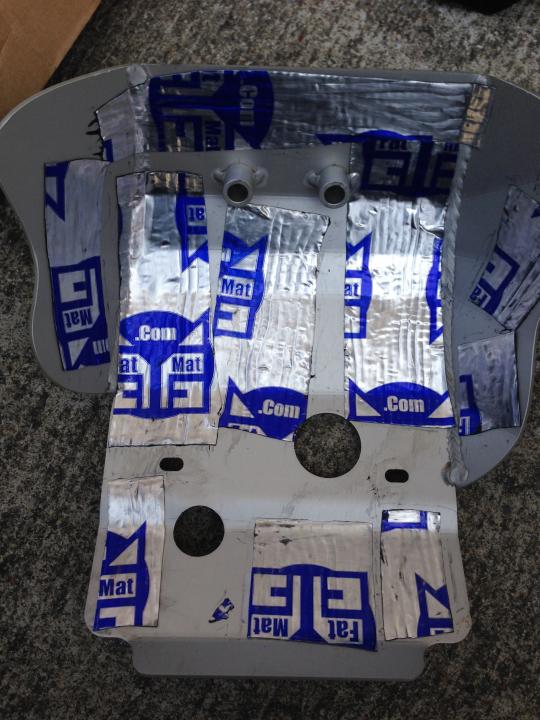
Did you add a skid plate? And now it makes obnoxious noise and vibrations? Try this... cheap sound dampening mat with a foil backing... I used "fat mat" because I had some left over from a stereo install.
My Honda CRF250L used to resonate in a tone that made my fillings vibrate... godawful to say the least. Now nothing... it still reflects more sound up than no plate but no more nasty resonance.
Cheers,
Dan
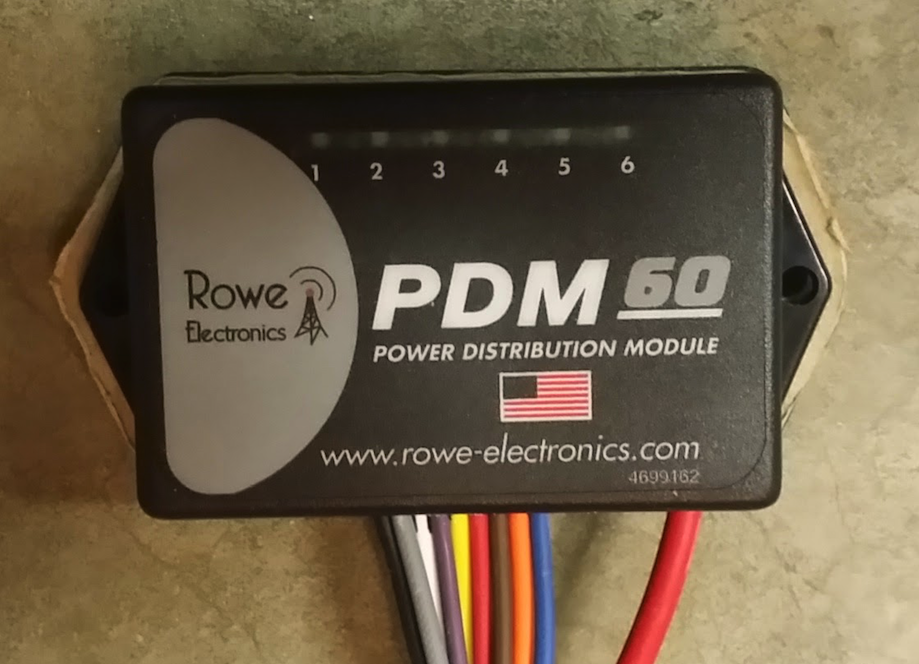
I had blown one of my auxiliary driving lights because I had gotten in the habit of just leaving them on all the time. As soon as I turned the ignition on they turned on, and in turn were subjected to the power fluctuations of engine start since they were wired to an ignition switched source. I needed a solution to prevent this from happening - enter the PDM 60.
The PDM 60 gave me the ability to not only eliminate fuses and relays, but create on and off delays for the outputs. Take a look at Rowe Electronic’s PDM 60 programming manual and Quick Start Guide and you can see that there is a lot of flexibility in the delays and circuit trigger options. My only complaint is that the “Delay On” timer, if used, applies to all circuits regardless of the mode selected, and the “Delay Off” timer applies to all circuits selected for delay off - you cannot have a different delay on or off per circuit, so you have to compromise a bit - at least in my case I did. There are other products out there that provide a similar solution, but the PDM 60 seemed to be the least over-done - I like to keep things simple, silly, stupid as much as possible.
In this application I was going to use three of the six available outputs. This may give you some ideas on how you want your own setup to function, and get the creative thoughts flowing.
Output 1 - Garmin Montana GPS
Ignition trigger. 15 second startup delay and 30 seconds shutoff delay limited at 2 amps
Output stays on for 30 seconds after ignition off (not engine kill). Garmin products automatically shutoff 30 seconds after external power is lost unless you tell them not to at which point they switch to the internal battery. This gives me time to poke at the GPS after I turn off the bike, or just let it shut off automatically after 60 seconds.
Output 2 - Driving Lights
Ignition & Ground trigger. 15 second startup delay limited at 4 amps
I am using a handlebar mounted switch to provide the ground trigger. This way I can still turn the lights on and off when the ignition is on. If I leave the switch on indefinitely, the lights simply turn on 15 seconds after I turn on the ignition and turn off when I turn off the ignition. A review of that switch can be found here
Output shuts off immediately when ignition is shut off regardless of handlebar switch position. If I use the kill switch rather than the ignition to shut down the bike the lights stay on if the switch is on.
Output 3 - Coil of slave ABS Disable Relay - See detailed article on this topic here
Ignition Trigger. 15 second startup delay limited at 2 amps.
I am using a handlebar mounted switch to provide a ground to one side of an ABS disable relay’s coil. The PDM 60 provides the 12VDC to the other side of the coil. Yes, I could have used the PDM 60 to control the ABS disable without a relay, but as I needed to switch a 30 Amp circuit I chose to use a slave relay. A review of the handlebar mounted switch can be found here
Output shuts off immediately when ignition is shut off. If I use the kill switch rather than the ignition to shut down, the ABS disconnect relay remains active. If I leave the ABS disable switch on indefinitely the ABS automatically disables 15 seconds after ignition on.
I went with a 15 second startup delay to allow the ECU to complete it’s startup, and for bike startup. 15 seconds after the ignition is switched on all outputs turn on except those selected for ignition & ground trigger, and those selected as inactive.
WARNING: There is a blurb in the manual that I almost missed. DO NOT attempt to program your PDM 60 while its 12VDC input is connected. According to the manual this can damage the unit. I had mine completely wired up, went to program, and was glad I read ahead or I may have killed the PDM 60.
WARNING: Pay special attention to how you plug in the programming cable. It will plug in in two different directions. One direction programs the PDM 60, the other direction destroys the PDM 60. There is a warning to this effect in the manual as well, but take your time making sure you orient the programming lead correctly.
NOTE: As per the programming manual you will need Microsoft’s .NET framework version 4 installed on the programming laptop/pc. The programmer installation file installs the USB drivers you’ll need for the programming cable. Once installed the programmer is very easy to use.
Yamaha Super Tenere Specific:
On the Yamaha Super Tenere the easiest and cleanest place to get your ground reference and ignition trigger is the stock aux lighting wire harness which is likely unused on your bike. This wiring harness is located under the lower right cover near the stock toolkit location. Connectors and rubber seals for this plug can be sourced from your friendly Yamaha dealer and cost less than a dollar if not free. There are two plugs/harnesses stashed just to the left of the stock toolkit location. One is triangular and has three connections that don’t go anywhere, and one is square and has four connections that don’t go anywhere. Take the male side of the, white, three connection plug down to your Yamaha dealer and ask for the connectors and rubber seals needed to complete the male side of this plug. (The four connector plug is for Yamaha accessory grip heaters). You can find a detailed writeup on how to utilize this plug within my ABS Disable Switch Article about half way down
I mounted my PDM 60 in the lower part of the electronics bay just behind the stock toolkit location. All my wiring and terminal strip is located in the stock toolkit’s location. I got rid of that useless piece of kit long ago, and created my own toolkit which I keep in my panniers. I made a mounting plate for the PDM 60 out of some 1/4” acrylic sheet (), bolted the PDM to the mounting plate, and used velcro to affix the PDM and mounting plate to the flat spot in the electronics bay. I used a 12 point terminal strip for all my connections to keep everything nice and tidy.
For wire routing to the driving lights and GPS I went up under the upper right side cover, through an existing wiring chase, and to the lights/GPS wrapping everything in heat shrink tubing. Pictures speak 1,000 words - see pictures below for reference.
Want to know what others think about this product or want to share your experience? Checkout our Reviews.
Disclaimer: You disable your ABS at your own risk. Damage to yourself, or your bike, resulting from this modification either during the modification process itself, or while riding with ABS disabled is solely your responsibility. Ok, now that that BS is behind us lets get to the modification.
Lets get right down to it!
It's really simple actually - the basic premise is that you want to be able to defeat the ABS when riding off-road or on loose surfaces to decrease your stopping distance, allow you to lock up the rear, etc., but we are not going to get into off-road riding techniques in this article. The simplest way to defeat the ABS is to simply pull the ABS Motor fuse, but that's a pain. You have to take off a body panel, remove the fuse, re-install the body panel, and then not lose the fuse. There is a safe way to accomplish this electronically however, without risk of damage to the bike's electronics.
Here's what you'll need:
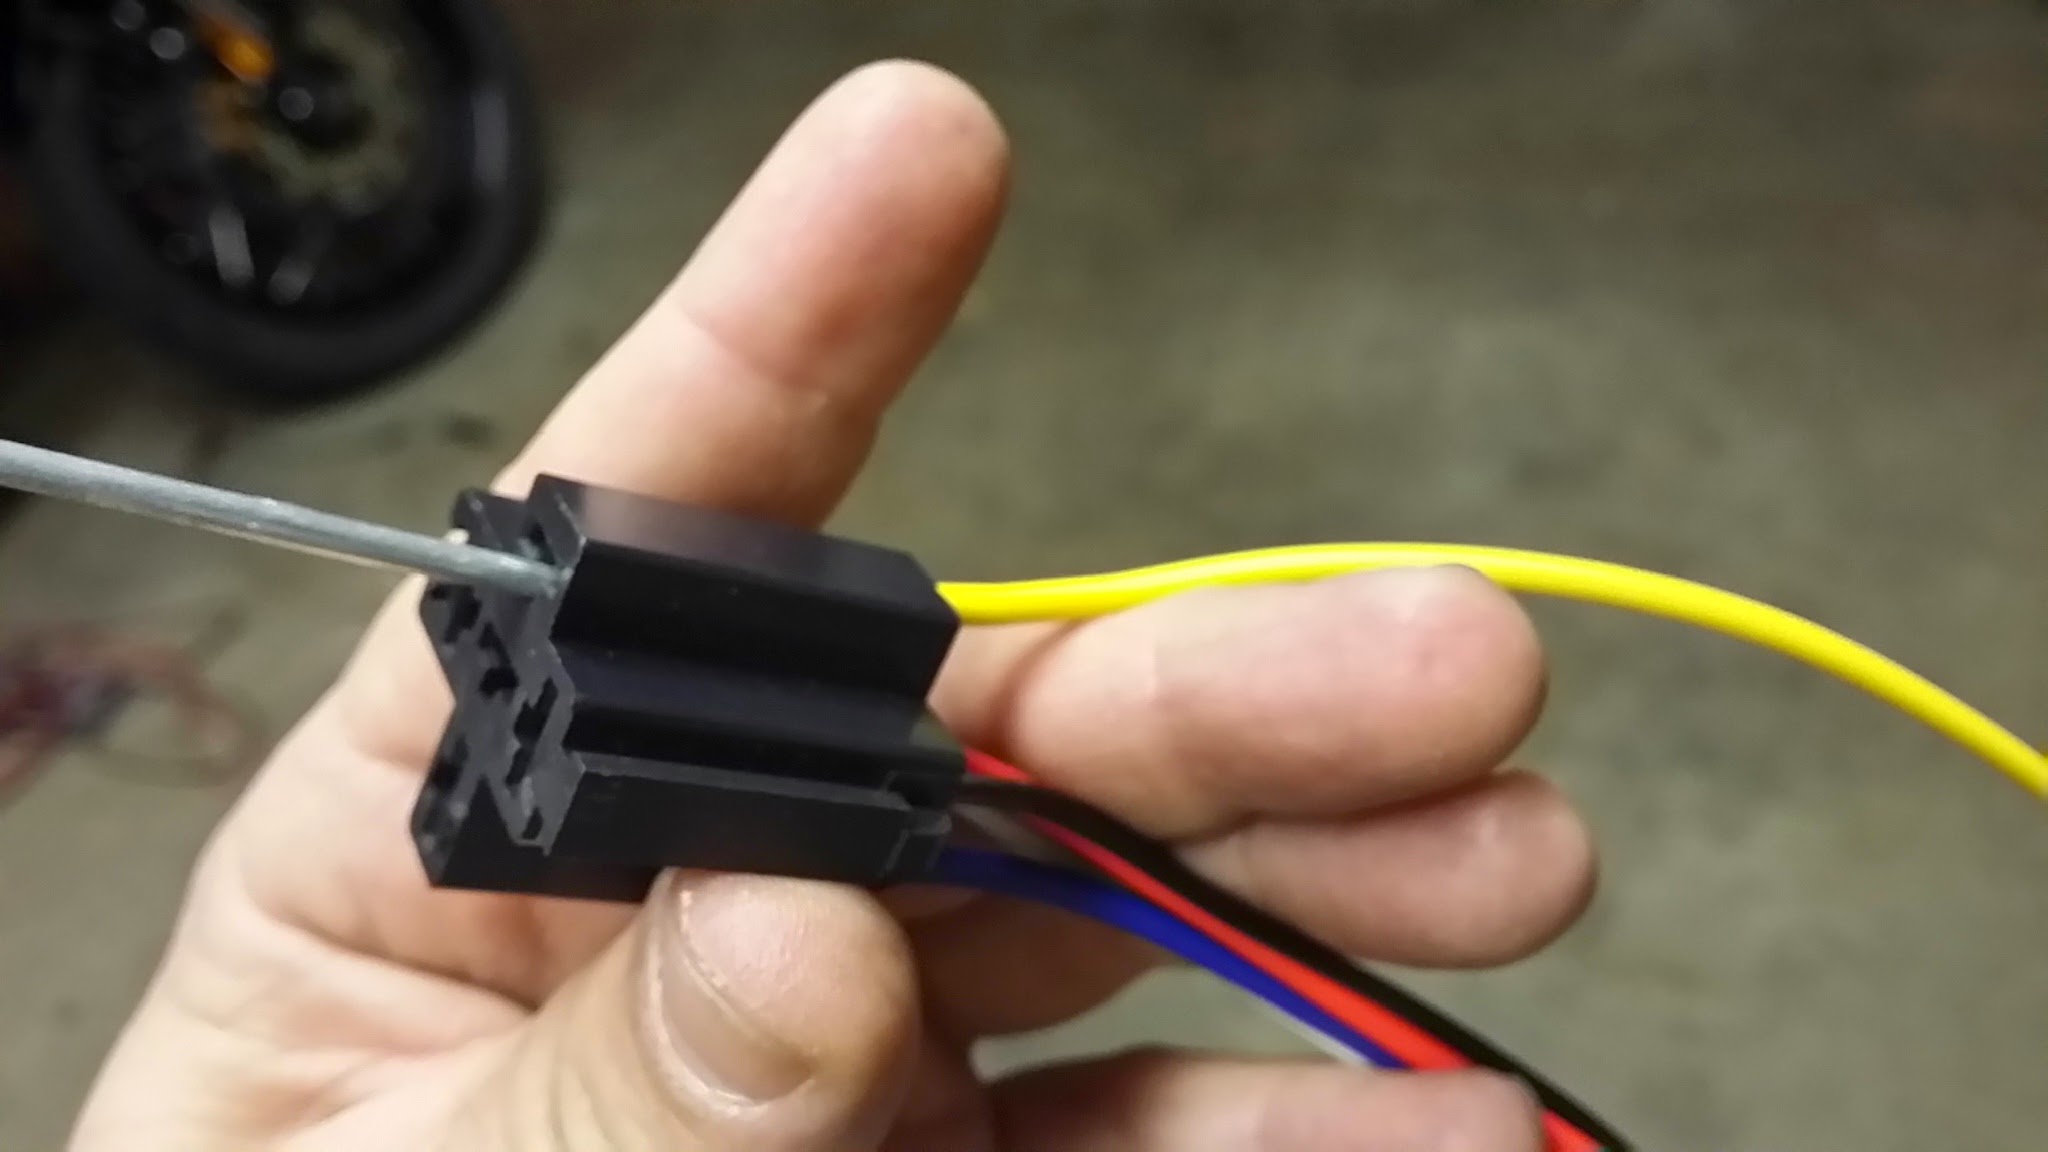
A fused single pole double throw (SPDT) relay such as the one found here: http://www.autotoys.com/x/product.php?productid=18599#tabs . You don't have to use a fused relay as we are installing all our circuitry after the factory ABS motor fuse, but I’m anal and like to fuse my relay contacts.
A relay socket for your relay like the one found here: http://www.autotoys.com/x/product.php?productid=320 which we will modify slightly.
An on off switch of your choice. This can be handlebar mounted, chassis mounted, whatever. The main thing is it simply needs to be an on/off switch (not momentary)
Three .250 12 AWG Female quick disconnects like those found here: http://www.autozone.com/ignition/electrical-wire-connector/dorman-quick-disconnect-terminal/296848_0_0/
One .250 12 AWG Male quick disconnect like the one found here: http://www.autozone.com/ignition/electrical-wire-connector/dorman-quick-disconnect-terminal/296897_0_0/
Some heat shrink tubing big enough to fit over the .250 connectors
About four feet of 12 gauge stranded wire.
Three pieces of 16 gauge stranded wire in 1 foot lengths in 3 colors (Red/Black/Yellow)
One short bolt, locknut, and washers to mount the relay
Connectors and rubber seals for the super-top-secret, unused, stock, auxiliary light plug located under the lower right cover near the stock toolkit location. These can be sourced from your friendly Yamaha dealer and cost less than a dollar if not free. There are two plugs stashed just to the left of the stock toolkit location. One is triangular and has three connections that don’t go anywhere, and one is square and has four connections that don’t go anywhere. Take the male side of the, white, three connection plug down to your Yamaha dealer and ask for the connectors and rubber seals needed to complete the male side of this plug. (The four connector plug is for Yamaha accessory grip heaters).
Once you have your shopping list fulfilled let’s get all our materials ready.
First we need to remove the insulation off the three .250 12 AWG female quick disconnects. Simply use a pair of needle nose pliers to twist, loosen, and pry the insulation off the stem. We don’t want any insulation on these connectors
Cut two 3” pieces of heat shrink tubing large enough to fit over the 12 AWG Male quick disconnect
Remove the wires and connectors 87, 87a, and 30 from your relay socket. Do this by inserting a small screwdriver into the hole near the connector (from the plug side), pushing in on the screwdriver while pulling the wire out from the rear
Cut two pieces of your 12 gauge wire to about two feet each. Strip both ends of each wire back about 1/4 inch.
Crimp or solder two of the .250 12 AWG female quick disconnects onto each end of one wire.
Crimp or solder one of the .250 12 AWG female quick disconnects, and the one .250 12 AWG male quick disconnect onto the other two foot length of wire.
NOTE: When attaching the wire onto the connectors make sure the end of the wire does not protrude past the sleeve of the connector as this will interfere with the locking mechanism inside the sockets later. Slide both 3” pieces of heat shrink over the wire with the male/female disconnects.
Snap the female end of your female/male wire into the relay socket #87a (Normally Closed) from the rear.
Snap one of the female ends of your female/female wire into the relay socket #30 (Common) from the rear. You will not be using terminal #87 (Normally Open) - leave this removed wire out of the socket. If this wire from terminal #87 is left in place 12VDC will be present on this lead when your ABS is disabled.
Install the relay onto the relay socket. Sometimes the new female disconnects won’t snap into the socket properly. Don't worry too much about this - just hold the wires into the socket as your push the relay into the socket and ensure a full connection on all leads of the relay to socket.
Strip both ends of your 1 foot lengths of 16 gauge wire back about 1/4 inch. Crimp or solder the small spades you got from your friendly Yamaha dealer onto one end of each of these wires. Insert them fully into the sockets in the plug from the rear paying special attention to match the colors with the colors in the female end of the socket on the bike (Yellow to stripe). You can grasp the connector ends inside the plug with a small needle nose pliers to help pull the spade connectors into the socket. We won’t be using the red wire, but make it anyway for future use and cap off the end. Slide the rubber seals over the wires and down into the holes in the plug after you have inserted the spades into the plug fully. It would also be a good idea to heat shrink the three wires together and make your own harness to clean it all up.
Now you are done with prep - remove the lower right, plastic body cover from the motorcycle to expose the battery and motorcycle's wiring. (the picture shows the upper cover removed as well - this is not necessary)
Disconnect your battery! You may think you can do the rest of this without doing so, but all it takes is one slip of a screwdriver, or one dropped wire in just the right place and you have blown fuses or worse. Save yourself the headache and Murphy’s law and just disconnect the battery.
If you haven’t already done so, remove the factory Yamaha toolkit, throw it over your shoulder, and create your own to store in your luggage. The factory toolkit for just about any motorcycle is a bauble thrown in by the manufacturer to say it’s there, and is close to worthless. There are many articles on the topic of what you need in your own toolkit. We will be using the factory toolkit’s storage location for our relay location. if you insist on keeping the toolkit, there are other places under this cover you can place your relay - proceed as desired.
Locate the white plastic connector between the two 30A fuses just above the battery, depress the release catch, and unplug the connector. The large, 12 gauge, red wire feeding into this connector is the 12VDC supply to the ABS motor. (see picture below)
Using a pair of snips, carefully cut a slit back in the black insulation around this wiring harness a couple inches to give you room for future steps. Be very careful not to nick or cut the insulation of the wires in the harness.
Examine the plug side of this connector. note the location of the connector for the 12 gauge wire. There is a plastic catch inside this plastic connector that locks the metal connector from being removed. If you insert a small, flat blade screwdriver into the plug side of the connector you want to release, and wiggle it around a bit you will release the catch and be able to remove the connector. There is really no way to take a picture of this, so you’ll have to experiment until you get the 12 gauge red wire and it’s connector removed. In the picture the white plug is still plugged in - yours won’t be. I was experimenting when I took this picture, so my plug was plugged in.
Insert the female connector coming from #30 of your relay socket (Common) into the white plug that you just removed the connector from. Push the female connector into the socket until it snaps into place
Insert the male connector coming from #87a of your relay socket (Normally Closed) into the female connector of the wire going to the ABS motor
Slide one piece of heat shrink over this connection, heat to shrink, then slide the second piece of heat shrink over the first - heat to shrink. We want lots of protection here.
Install your on/off switch of choice, and route the wires down to the area where you’ve chosen to house your relay.
Plug your newly made 3 pin wiring harness into the factory auxiliary light harness. Again, make sure you plug this in correctly and match red to red, yellow to stripe, etc. If this plug is already used find another source of ignition switched 12VDC and ground for the next steps
Connect one of the two leads coming from your on/off switch to #85 of your relay socket (Coil).
Connect the other of the two leads coming from your on/off switch to the black wire (ground) coming from the factory auxiliary light harness you made.
Connect the yellow wire from the factory auxiliary light harness (switched 12VDC) to #88 of your relay socket (Coil).
If you chose to install your relay in the toolkit location, drill a small hole in the flange about midway up the rear portion of the toolkit’s cubby to mount the relay to. Run your Bolt, washers, and lock nut through the relay and hole to secure.
Carefully stuff the wiring into the toolkit cavity and secure with your preferred method. You can use a zip tie or even use the factory rubber bungy that held the toolkit in. Re-stuff the factory hand grip and auxiliary light plugs into the cavity where you found them behind the factory toolkit location.
That’s it - your done! Reconnect your battery and enjoy.
The way this is wired you can safely leave your ABS switch in the closed position when you turn off and start the bike. there will be no parasitic draw from the relay's coil during power off as we used the switched 12VDC from the bike to the coil of the relay. As soon as you turn the bike on, and if your switch is closed, the ABS will disable. To re-enable the ABS you will have to open the switch, turn off the bike, and restart the bike.
Enjoy!
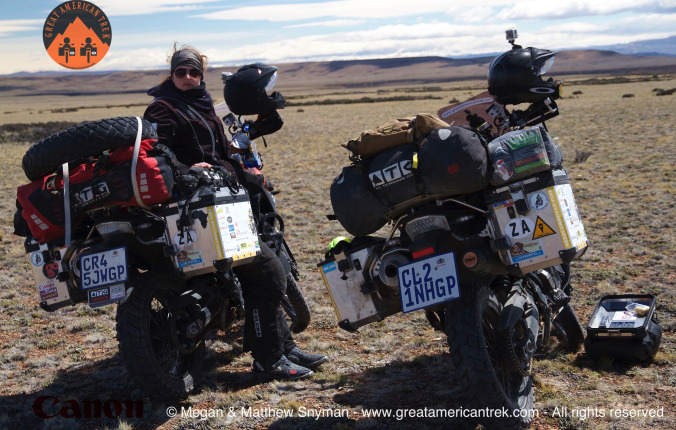
How do you pack for an extended overland motorcycle trip as a woman? We all know that guys are willing to turn their undies inside out – repeatedly-, and will wear a shirt till it is basically paint-stripper in order to keep packing light, but I don’t think many women are willing to go that far.
I LOVE traveling, but I also usually never pluck my own eyebrows (it always goes badly wrong), I go for regular waxes, love to get facials, and I cover my ever expanding range of grey hairs (I blame my husband and trip-planning) with hair-dye at the local Hyde Park Salon. My first overseas trip at the age of 16 saw me take a suitcase for 14 days travel that I couldn’t pick up myself… Despite the above, however, I am not a girly-girl and think I can easily adapt to travel without the above luxuries.
Here is what I packed for our 12 month plus overland trip on two BMW F800 GS motorcycles, never having attempted a trip like this before. The list does not include our shared medical kit, camping gear, kitchen or toolkit and is only my gear: what has worked and what hasn’t after 4 months of travel. I am sure in another 4 months it may look very different, and I will do another post closer to the end of our adventure.
What I love:
3 garment mesh bags of various sizes, made by Sea to Summit, and sold by Adventure Inc: Matthew initially teased me about these, but they have also proven to be one of the best things we bought and take up no space. You can use separate bags for pants, tops, underwear or a combination, and they greatly simplify your daily packing and unpacking. They have also become extremely useful as camp pillows: They are both soft and the perfect size and thickness.
Toiletry Bag: Cause we all know that when your toothpaste leaks you don’t want it between your clothes.
Deodorant: I picked the non-spray version as it lasts longer.
Dermalogica Face Cream: This is good cream that I had at home and wanted to use for as long as possible on the trip. No plans to replace it when it runs out, but so far it has lasted me 4 months. You have to take care of your skin, especially your face.
SPF 50 Suncream for your face, supplied kindly by the Fourways Aesthetic Center: The sun is strong and sun-damage is not reversible. This small tube has protected my face every day for over 4 months and is still going, where in South America the UVA exposure is often above 13 (extreme). I haven’t burnt once.
Disposable razors: Because waxing is not a viable option.
Toothpaste and Toothbrush
Toothbrush cap: Matthew teased me for this too but it has proven to be more than useful and takes up no space. Great not to rest your toothbrush on a gross hostel basin, and you can put a wet toothbrush back among your things.
Nail file: Because nothing is more annoying than a nail that hooks on gloves, hair and clothes.
Tweezer: Has multiple uses from removing splinters to plucking eyebrows
Nailclippers: This set is shared between Matthew and I
Small scissors: Multitude of uses from cutting open packages, bandages, trimming beard hair (not mine) and eyebrows.
Assorted hair elastics
Small tub of cream for hands and elbows
Perfume: small bottle of perfume that I admittedly rarely use, but I love that occasionally I can smell great, and I can’t part with it.
Small MAC concealer for emergencies: Same as above
Dermalogica Face wash: Left over from home supply now finished and the bottle has been recycled for pepper in the kitchen.
Dermalogica Face exfoliant: Still going strong
Conditioner
Shampoo
Anti-chaff cream: a saviour! Especially on the F800’s seat
SPF 30 suncream for your face: An extra I packed but have not needed to use yet, could do without, but I keep it in my Tank bag
Another small tube of cream for a pocket or tankbag: I took a few small ones, rather than one big one, but have recently decided to rather carry a big one we share and leave the small ones.
Cashing in on assorted free samples I have collected
Baby powder: This is a saviour for chaff and days when you cannot shower.
Vicks Vapo-rub: Sorry this belongs in medical
Floss: always essential for your teeth, for sewing clothes or for emergency stitches.
Assorted lipbalms: these small Zambuk’s from South Africa are really small, they last long and also work wonders to relieve itch from mozzie-bites
The smallest hairbrush I could find: If you think this is a luxury you have never ridden a motorcycle with long hair – birds-nest comes to mind.
Two small body washes – one for Matthew and one for me. Now we just share from one bottle.
Assorted Tampons and pads: These are personal preference, and I have had no problems replacing both in South America. Remember that in Africa in the rural areas you will rarely find tampons, and that their use is also dependent on your own hygiene. Please carry a small plastic packet for their disposal – you do great damage by leaving these in nature.
Arnica oil: We threw this out after not using it for a month and trying to reduce our load, then two days later needed to buy some more (Not vital for everyone as anti-inflammatories do the same job, however Matthew cannot take those and therefore Arnica is our only option)
Flixonase nasal spray: actually for medical but I carry this with me to ward off regular hayfever attacks.
Mosquito repellent: Citronella repels mosquitoes but not strongly and especially little in the open air, so if you travel to areas with Malaria, Dengue or many bugs get something with the active ingredient such as permethrin. We bought this Vital Protection at the local pharmacy for R120 (±$11). It even repels spiders (tested myself, not advertised)- vital for me. They also have spray for textiles and even a wash for clothes, where it lasts for 3 months!
Wet-Wipes: moistened towels that serve in place of a bath or shower and many other uses.
Travel book: This small book is where I keep our insurance details, the contact details for important people and all the details for the people we meet on the road.
Travel sewing kit: I have used this kit more than I would have liked, and just added some larger needles and thicker thread.
Pair of tights: I have often worn these, including under my motorcycle pants in the cold. They are now too big for me and riddled with holes. I will be replacing them soon.
Pair of shorts: I didn’t end up taking this pair (they are white) but bought a pair on the road when the temperature went up.
Thermal underwear: These were not the best and after freezing in southern Argentina, I threw them out and invested in a decent pair of thermals that are also smaller and lighter. Don’t cut corners on thermals if you will be riding in the cold.
Two bra’s and one sports Bra- I save the sports bra for off-road riding.
Muggers wallet: I use this small cheap wallet to hold dud cards and some small change
Pretty headband: Love this
Fleece top: I took a fleece I bought in RSA on a cold ride in Dullstroom. I love it and it is great under the riding jacket – please note my jacket does not have a warm layer.
Small pullover jersey: to wear off the bike
Pair of Kevlar jeans from X-Kulcha: These have served me well and double as jeans for around town. They have made a range and these “skinny” jeans fit well and are strong, they also don’t look like riding jeans.
Pacsafe: This is usually a backpackers item, but has become a bike-lock on our trip. It is long enough to lock our two BMW’s together and we do so every night, even behind locked gates.
Underwear: I have taken 2 pairs of recommended Bamboo underwear that reduce chaff, don’t migrate and last long. I am not disappointed. I did however add a few pairs of cotton underwear and the total is 6 pairs.
Tops: 1 x longsleeve top, 1 x spaghetti strapped white top, two vests, two t-shirts, 1x black long fitted top and 1x shirt. These cover for a range of climates, however white is a bad idea as I cannot keep it white. The black long fitted top has been my best so far.
1x pair of leather motorcycle gloves from X-Kulcha: I wear these every day, and though not waterproof, they have proven both comfortable, hardy and surprisingly windproof. I am really impressed by these gloves and will buy them again.
1x microfiber towel: These are great space savers but I have lost mine and now use a facecloth. I have one complaint and that is that after a certain period of use these microfiber towels develop an odour that no amount of sun-exposure or soaking can erase.
Mosquito net for face and head: We bought these cheap nets on recommendation from travellers who have been going for over 11 years. We thought them really dorky at first, but are so glad we have brought them, we use them often
Glove inners: one set of warm glove inners are vital for the cold.
1 x set of gloves for off the bike. These are fingerless gloves that double as mittens from K-way South Africa and are the best I have ever owned.
Bikini and sarong
Motocross socks: Three pairs of motocross socks have worked perfectly in wash rotations (especially when the weather takes a few days to dry a pair)
1x neck warmer – a fleece neck-warmer that can double as a beanie. I love it. Also from X-Kulcha South Africa
Assorted socks: to wear on hikes and around town. I have 4 pairs.
Assorted Buffs: I have taken 4 buffs and one windproof buff from Adventure Inc. with me. Their uses range from keeping the hair out of your face, to keeping bugs and wind off your neck and even as emergency hair elastics, towels and visor cleaners. I also wrap these around my camera in my tank bag to keep the camera cushioned.
1x small dress: this lightweight dress is packed for the extreme summer heat – which I have so far only seen in Mendoza and the Atacama Desert
What hasn’t worked well:
A: Rain proof outer gear for riding – This set of plain, plastic worker’s waterproof overs were recommended by a number of people. They served well to keep me dry in a few rain-storms and then the plastic wore at the seams and they were no longer waterproof. For shorter trips they may work, but not for extended travel – unless they can be regularly replaced. I also had to cut the bottom of the pants to fit over my riding boots. It has been 2 months and I have not yet managed to replace them, despite visiting every fishing shop in Chile.
B: Hairband for when showering and washing face: I have thrown this out as I never use it, and Buffs do the same job.
C: BB Cream: I also hardly ever use this, and my skin is finally clearing without the stress of a regular job. I haven’t parted with it yet, but will very soon. It is time.
D: Anti-dandruff Shampoo: I would not have packed this if I knew how easy it was to find Head-and Shoulders
E: Small bag of anti-oxidant treatment for skin regularly exposed to the sun. This was supplied by a friend in large quantity and we have had to cut down, but I am still using these vials in place of face-creams.
F: Corega effervescent tablets: These were important for me to pack as I use a bite-plate due to grinding my teeth at night. I have subsequently stopped using the plate, and have thrown these out.
G: Small flat mirror: a gift that cracked within the first few days, which we tried very hard not be superstitious about. Not necessary to replace as there are mirrors on the bike – if you really need one.
H: Thick warm Hoodie : With much regret I had to get rid of this hoodie. It was too big and heavy, and did not provide enough warmth. I hope a lucky backpacker adopted it.
Not seen above:
All Terrain Gear Soft luggage 50L (seen below): This awesome bag is waterproof, dustproof, bugproof and hardy. It comes in a variety of bright, high-viz colours and has reflective detail. A strong feature are the large number of D-rings and other areas to tie things to. We leave this bag outside the tent under the rain cover and just close it at night, where it has often stood in water overnight with no problems.
Cap from Country Trax made by X-Kulcha: to protect me from the sun off the bike
1 x pair of Sidi Motorcross boots: Despite all the discussion about comfort of motocross boots on long adventures, I have worn mine for longer than the first 4 months of my trip and find them extremely comfortable. They have also served just fine for walking around towns to look for places to stay, though you look a bit hardcore. I have walked through shallow water without them leaking, but at speed on a bike, in heavy rain, they are not waterproof. However I consider my legs more important and will not ride without the articulated ankle and full-length protection – as they already saved me from a fracture 3 weeks before we left on our trip. This is the bruising from the redistributed force…
Leatt Adventure Jacket: This amazing Jacket fits the Leatt neck brace and is fully waterproof to the top of your neck. I have found it comfortable to wear, well ventilated in the heat and windproof in the cold. It is filled with many pockets and hidden pockets, in both the waterproof and outer layers. It is however lacking a warm layer and I have had major problems with the main zip, a weak point of the jacket, which Leatt is aware of, and promise to rectify in future models. I will definitely use this jacket again in the future.
Leatt neck brace: This neck brace has thrice saved Matthew’s neck (once on this trip when he hit a rock in the loose sand at speed in Iquique), and neither of us will ride without one, even down the road to the shops (ATGATT!). The new braces are so low profile that you don’t notice you’re wearing one.
X-Kutcha Dakar riding pants: These pants have worn well over months of travel and are very hardy, looking brand new after every wash, so much so that it’s a bit spooky. They have reflective details, dry extremely fast, don’t smell at all and are made from tested Kevlar for protection. However they lack waterproofing, wind-proofing or a warm layer. Hard knee protection also had to be added after market.
Earplugs to protect from the noise: we use the MotoSafe range, bought from and recommended by Touratech South Africa and find them comfortable to wear over long distances..
Salomon XA Pro 3D GTX shoes: These versatile, waterproof and durable shoes fit well into my adventure. When I get off the bike these are what I wear from walking around a town to hiking Torres Del Paine. As a doctor these are all I wear on 36 hour shifts too. Highly recommended and there is no equal.
Flip-flops (sandals): I carry a pair of havaianas that are durable and comfortable
Added on route:
Down jacket: I added a down jacket to my kit in Southern Chile after riding in average temperatures below 5 degrees C. I have never regretted it and it stuffs really small into its own stuffsack.
Waterproof outer shell: a Thin waterproof jacket to protect the down when off the bike and for walking around town. The windproof aspect also really helps to conserve heat.
Aqueous cream: In the very cold and the very hot, it is difficult not to use a moisturiser. This cream works best as it is free of perfumes and other additives and can therefore be used as a face cream too. Especially in the cold I struggled with cracked fingertips, a seemingly minor problem until you develop it and you struggle to strap your gear to your bike for the pain.
SPF 30 Suncream to use on our bodies and can also double as a moisturiser – though not a good one.
Two facecloths to replace my lost microfiber towel.
In-ear ear-phones: we bought at duty-free in Chile. If you really get in-ear phones you can hear your music or partner while riding on highways or in gale-force wind, without any discomfort from the helmet. We use them with our Sena Bluetooth kits to chat or listen to music. We never got these before we left and I regretted it everyday till we found some in Chile.
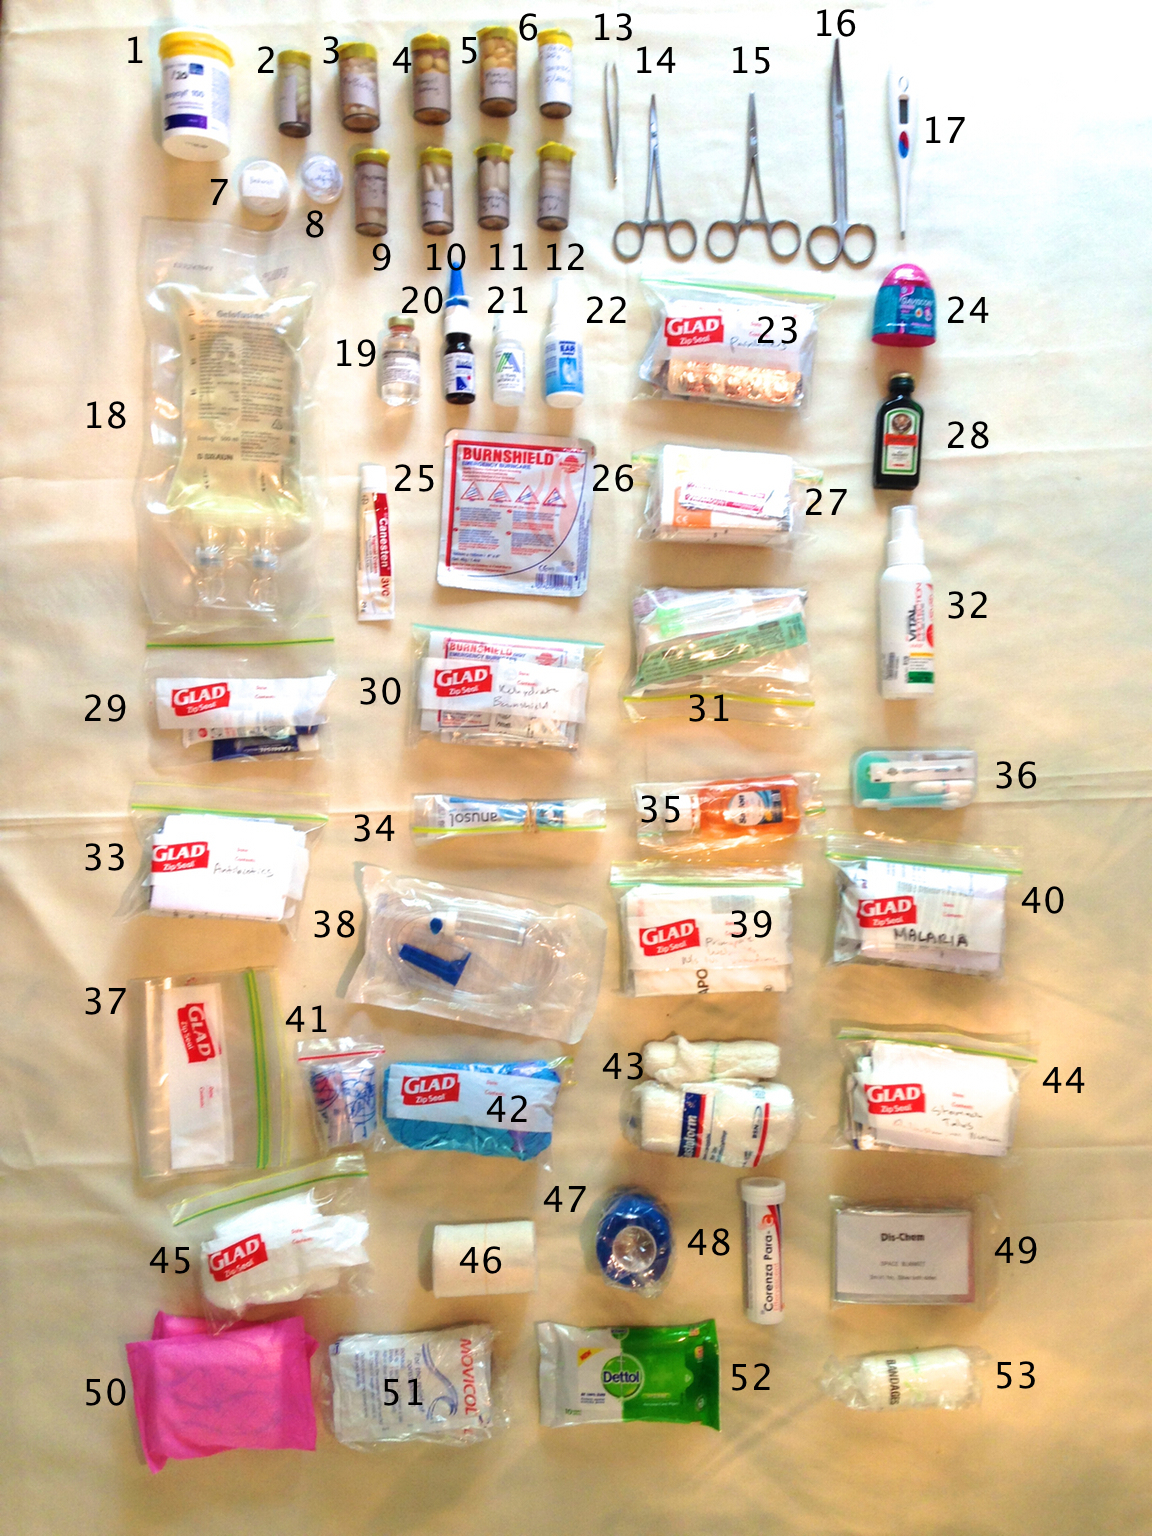
So here is the first of many packing lists still to come. Lots of people have been requesting these, so we thought we would start with our “first-aid” kit – as two doctors, what we made is not really a first-aid kit, its slightly more, sort of a Frankensteiny resus kit.
Important stuff to remember:
You must take a script for all medications and include it in it’s associated zip-lock bag just in case.
Very important, is how to package pills for a motorcycle trip, especially an off-road one. With all the moving and shaking all your tablets will turn to dust in 30min if you don’t package them tight. We put them into pill bottles and then filled the rest of the bottles tightly with foam, so nothing can move around, then sealed the top with insulation tape to prevent anything getting wet. This was a lesson learned through experience
But anyhow, here you go, this is what two doctors think you should take on an extended motorcycle trip.
Let us know if you have any questions or recommendations, maybe we forgot something – a medical kit is a constantly evolving thing: no medical kit is ever complete!
Hospital in a bag
Doxycycline 100mg dly (script needed but you can get one from any travel clinic if they know you are traveling to a malaria area) – Malaria prophylaxis – the cheapest, easiest way to prevent malaria, we are going to spending a lot of time near malaria, so we have a 3 month course each inside that little bottle. Luckily, its also the treatment for tick-bite fever, and if you’re that way inclined… STDs
Adrenaline – 2 x 1ml vials: For dire emergencies involving anaphylaxis (allergic reactions) or shock. As a non-medical professional, you can get an epi-pen prescribed for you, its just crazy-expensive: an epi-pen is ±R1000 and a vial of adrenaline, which is exactly the same thing, is R1..
Probiotics (interflora – can buy over the counter): Essential when taking antibiotics to replace the ‘good bacteria’ in your gut to prevent associated diarrhoea and general crappyness – also good for normal diarrhoea
Flagyl (Metronidazole – script needed) (4 courses): An antibiotic for bacteria that causes traveler’s diarrhoea
Also flagyl (traveler’s diarrhoea is no joke people!)
Alzam (20 tablets) (Xanax – definitely need a script): An anti-anxiety medication, for Meg’s fear of flying and any trouble falling asleep
Inderal (6 tablets): Beta-blocker also used for anxiety (not essential for every medical kit and script needed)
Prednisone 20 x 5mg tablets: For allergic reactions – (script needed)
Augmentin 1g (4 courses) (amoxicillin + cluvanic acid – script needed): A broad spectrum antibiotic for a broad spectrum (duh) of infections and sicknesses
Augmentin
Augmentin
Even more Augmentin
Tweezers
Mosquito forceps: Can be used to grasp and clamp off bleeding vessels in a bad injury, grab small foreign objects, and can even be used as a tool when working on the motorcycle engine with small parts
Artery forceps: Can be used for the above, as well as for stitching to hold a needle
Scissors: Cut stitches, clothes, bandages, etc etc.
Thermometer: Used to diagnose a fever as well as monitor it’s response to antibiotics
Gelofusin: An intra-venous fluid that is given via a drip to replace large volumes of blood loss. This might seem a little drastic, but as doctors on a motorcycle trip, we just don’t want to be without it. Not worth taking if you don’t know how to use it – can be dangerous if given incorrectly
Lignocaine: local anaesthetic for sutures or any other owie that requires it – script needed
Iliadin nasal spray: a bocked nose can be a real bitch (any decongestant spary can be bought over the counter)
Tears natural: For dry or irritated eyes, or if your in a weed-legal state
Swimmer’s ear drops: Clear water out of your ears
Variety of pain killers, from mild to just below horse-tranquilizer – includes:
Stilpayne (Codeine and paracetamol – script needed)
Panado (Paracetamol – over the counter)
Tramacet (Codeine and Paracetamol – script needed)
Oxycontin (codeine – scedule 6-7, definitely needs script)
NB: We haven’t included any Aspirin or anti-inflammatories here as I (Matthew) am severely allergic, otherwise a really good idea and can be purchased over the counter
[*]Gaviscon tablets: For heartburn. Its bound to happen
[*]Canestin cream (cotrimoxazole – over the counter): For a cookie-itch (thrush)
[*]Burnshield 100×100 dressing: for all sorts of burns, with a hot exhaust around you can’t be without this!
[*]Dressing pack:
Plasters – variety, important for blister prevention / relief
Sterile blades – variety of uses including cutting loose skin from wounds, draining abscesses, shaving hair around wounds etc.
Steri-strips – stitchless wound closure for small wounds, or for those who can not suture wounds
Variety of sutures – for those who can
Opsite – basically medical clingwrap: to cover exposed wounds to keep them clean or to secure an iv line etc etc
[*]Jagermeister: Why WOULDN’T you carry Jagermeister!? – no script needed
[*]Burnshield gel tube and lamisil:
Burnshield once again, this time in a gel form, so you can apply to wound and cover with a different bandage
Lamisil (Terbinafine ointment) in case of any athlete’s foot picked up in dodgy bathrooms
[*]Variety pack:
Burnshield 25×50 dressing
2 x sachets of vital protection (washed in with clothes to offer 3 months of mosquito-repellant clothing)
Rehydrate – important to combat dehydration, drink when experiencing diarrhoea or vomiting,
Condoms (variety of uses apart from the obvious very important use)
[*]Syringe and needle pack:
1 x 10ml syringe (for diluting adrenaline)
2 x 2ml syringes (for administering lignocaine)
Various needles (also useful for removing splinters etc.
Gelcos in various sizes (for inserting iv lines)
[*]Vital protection spray – mosquito repellant, also lasts for 3 months after applied to clothes and tent
[*]Variety pack 2:
Chloromycetin eye ointment (chloramphenicol – script needed): for eye infections
Vermox 500mg stat (Mebendazole – over the counter): for, you guessed it… worms (and other parasites)
Augmentin 375mg – milder course of Augmentin
Ciprobay (3 courses) (ciprofloxacin – script needed)- antibiotic for urinary tract infections, and travelers diarrhoea
[*]Anusol: For haemorrhoids. It happens, and its even less fun when you have to ride a motorcycle for days on end
[*]Savlon: General antiseptic solution
[*]Variety pack 3:
Tampon: also a variety of uses, including stopping severe nose bleeds, whilst inducing hysterical laughter in those around at the time. Can also be used to plug a large, bleeding puncture wound
Dental floss: Used as floss, emergency suture material, or as thread to sew on loos buttons etc – very strong
Ear buds: Remove foreign objects from eyes and wounds and for applying ointments
Toothpick – because it doesn’t take up any space and Megan wanted it – use pending…
Bandage clips x 6
Safety pins x 10
[*]Plastic zip-lock bags: the uses for these are infinite, a vital thing to take
[*]IVI line – for putting up a drip
[*]Variety pack:
Betadine antiseptic ointment
Water for injection x 2 – to dilute adrenaline
Alcohol swabs – also infinite uses, including cleaning a site before injection or lancing, cleaning a small wound, cleaning skin before applying a plaster etc etc etc.
Primapore : Wound dressing
Gelonet: wound dressing for wounds where there is a danger of the gauze of the dressing sticking to the wound (burns, grazes)
[*]Malaria kit :
2 x rapid test kits (can be bought at a travel clinic)
Instructions
Co-artem tablets 200mg (artemether/lumefantrine – script needed) for malaria treatment before you get to a hospital
[*]CPR barrier device: For giving CPR to a stranger
[*]Rubber gloves: For working on people and bikes, keeps off blood as well as grease
[*]Crepe bandages
[*]Variety pack : The tummy stuff:
Immodium (Loperamide – over the counter) x 24 tablets: Diarrhoea + motorcycles = not cool
Buscopan (Butylscopolamine – over the counter) x 20 tablets: Stomach cramps
Desolex x 20: Antihistamine with no side-effects of drowsiness
Valoid (cyclizine – over the counter) x 10: Vomiting, nausea, and motion sickness
Maxalon (Metoclopramide – over the counter) x 20: Vomiting and nausea
Motilium (Domperidone – over the counter) x 10: Also for nausea, vomiting or bloating
[*]Sterile gauze: for dressing wounds
[*]Elastoplast
[*]Compression dressing (self-adherent): for strapping sprained joints and sore muscles, stopping bleeding, and securing bandages
[*]Corenza Para C (I’m allergic to aspirin remember): For colds and flu
[*]Space blanket: For hypothermia and shock
[*]Sanitary pads: highly absorbent wound dressing for bleeding wounds
[*]Movicol (Macrogol – over the counter): Because constipation is arguably worse than diarrhoea
[*]Dettol wet wipes: For general hygiene and cleaning your dirty paws
[*]Another crepe bandage (75mm)
Not included in the picture (but also important):
Antihistamine ointment
Citrus soda sachets (for urinary tract infections or heartburn)
Flammazine ointment (for continued treatment of burns ie. from 24 hours and after burnshield has been used in the immediate treatment)
Although the above seems like a lot, its really really important, and only packs up to:
So it all packs up pretty small
Once again: let us know in the comments if you have any questions, recommendations or advice
~Matthew
Often one is faced with marketing propaganda that is tough to decipher. One area that there is often confusion or misunderstandings about is lumen ratings on aftermarket LED auxiliary lights.
A lumen rating is the amount of light given off by any particular source, If we are talking about a light bulb, that is a legitimate use for a lumen rating, If we are talking about a complete light with optics, then the term lumen falls very much short of telling the customer any real info.
Very often in today's market place, we see lights rated at 4400 lumens or even more. Will a 4400 lumen light allow you to see better than a 1000 lumen light?
Not necessarily. In fact sometimes quite the opposite, the 1000 lumen light wins. Optics are the key to getting a great quality light beam that will allow a rider to see what they need to, without blinding oncoming drivers and lighting up the tree tops. The real information that a rider needs is a lux rating at a given point. Beam pattern selections are also very important.
Prior to making a lighting decision for your trusty steed, take a look at what lights truly do offer a real optical enhancement that optimizes what lumens are available. In general a single source LED with a large optic will optimize the amount of raw lumens at hand. A multi-emitter light may look brighter, but due to the lack of space for quality optics they often cannot match the long distance penetration offered by a single emitter design.
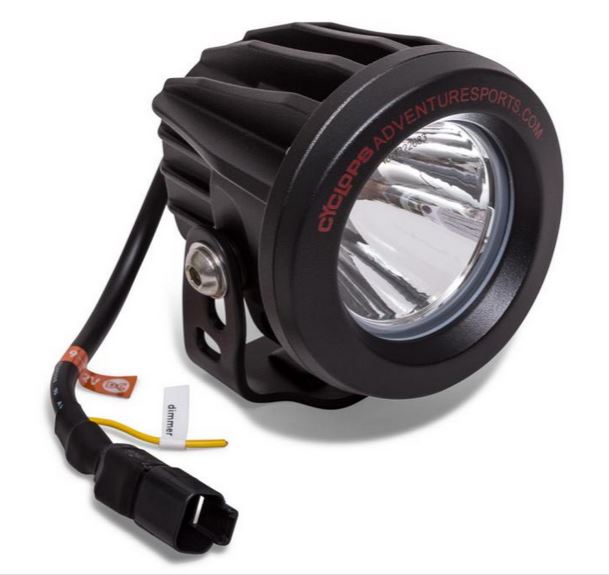
Here is a great example of a quality built light that draws 10 watts of power yet provides more than 800 ft of light throw,
The Cyclops Adventure sports Long Range Optimus LED offers outstanding long range distance as well as a tunable product with the availability of wide beam filters that alter the beam pattern for a clipped optic (upper cutoff) that helps to eliminate oncoming blindness, yet retains much of the long range penetration so commonly not found on LED aux lights.
Note the large optic and single emitter design.
With the wide angle filter
LED lighting is a continuously evolving technology. We will all be rewarded with great products from top manufacturers and suppliers as time goes on. In this case a little knowledge goes a long ways.
This method is painless, easy, and will protect your boots for many years of service, especially in wet conditions. Most MX boots are not the best at keeping your feet dry, and as they age, the preservatives contained in the leather lose thier effectiveness. This works wonders for speeding up the Break-In process, and also preserves older leather from drying and cracking.
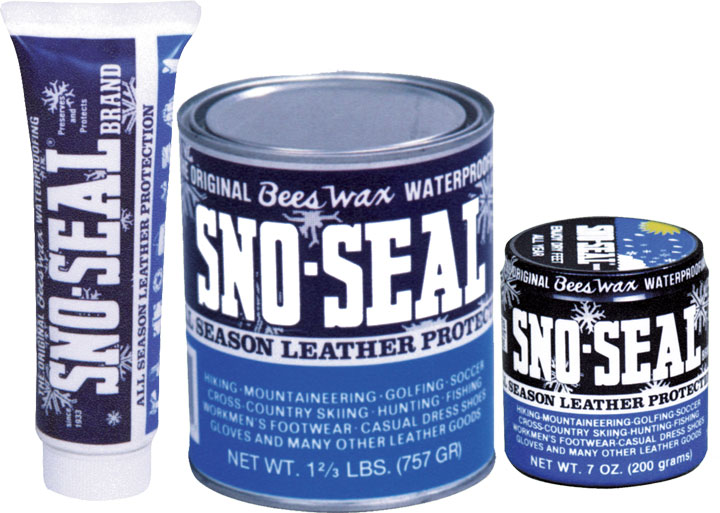
Materials-
> Sno Seal 100% beeswax leather protectant and waterproofer. Avoid using any product that contains animal fats, they will cause the stitching and leather to degrade and fail over time. Animal fats contain acids.
> Large towel for lap rag.
> Smaller wash-cloth sized towels for application of Sno Seal.
Steps
1. Send your wife, fiance, girlfriend, or mother away for a few hours. Trust me, they will not be pleased with what you are about to do in the oven.
2. Thouroughly scrub your boots. Remove any caked on gunk, grease or trail grit. Simple Green and a scrub brush work wonders.
3. Cover the oven rack with a layer of tinfoil, to avoid later cleaning, and incriminating evidence of what you used the little woman's oven for.
4. Pre-heat an ELECTRIC stove to 200F. NEVER use a gas stove, the flames may catch boot linings on fire.
5.Place boots in oven, leaving the door cracked slightly.
6.Allow the boots to get warm to the touch, they will be about the temp of toast straight from the toaster.
7.Remove one boot from the oven, and using the smaller rags, apply a liberal coating of Sno-Seal while rubbing briskly. The boots will absorb it like a sponge, and continue applying until they are cooled off and won't take any more.
8.Replace boot in oven, while leaving door slightly open. Allow the boot to warm back up, and the excess Sno Seal will be drawn into the leather.
9.Repeat until the leather is saturated and won't take any more.
10.Wipe off excess Sno Seal.
11.Put your boots on, and wear them and walk until they cool. There will be no more stiffness, and they will form to your feet like a cotton sock.
12.Clean up all evidence of your kitchen transgressions before the lady of the house comes back.
Depending upon the conditions that you ride, you'll likely need to do this 2-3x year.
The main cause of blisters on your hands is a mixture of sweat or moisture inside your glove and friction! Sometimes you can't really help getting your hands wet, but you can take some preventative measures before you ride to prevent blisters from sweat.
Buy some ANTI-PERSPIRANT (extra dry by Arid works great) and before you put your gloves on, spray on the "AP" to both hands liberally and rub your hands together until it soaks in and dries. When your hands feel powdery, it's time to slip on your gloves and hit the trail.
For added protection, you can spray the outside of your gloves with Scotch Guard or other brand of water repellant to help ward off splashes from puddles.
If this doesn't cut it for you, you'll need to take go to the next level and tape your hands. To do this, you'll need:
- 1" and 1/2" waterproof adhesive tape (white Johnson & Johnson is good).
- Package of Dr. Scholls Moleskin Padding.
Before you do anything, thoroughly wash your hands so that the tape has maximum adhesion.
Trim the Moleskin to the appropriate size to cover the areas where you tend to get blisters. Use the 1/2" tape to secure the Moleskin pads to the areas in question.
For the pads of skin right below each finger, the 1/2" tape should start on the Moleskin pad, wrap abound the corresponding finger then back across the same Moleskin pad. When done properly, the two ends of the tape should cross each other (make an "X" as they pass over the Moleskin pad. Repeat for each finger necessary.
Now, take the 1" tape and wrap your hand. Open your hand fully and wrap it with 3-4 courses, with each course overlapping the first about 2/3rds. The first course should start just below where your index and pinkey fingers meet the palm of your hand and the final course should end just a little before where your thumb and index finger meet.
Lastly, make a fist a few times, note the areas where the tape is too tight and cut a small slit in that area. Most of the time we're talking not more than a 1/2" scissor cut.
While the wrap my feel a little uncomfy at first, you'll forget about the tape as soon as you get out on the track or trail and your hands will thanks you later...
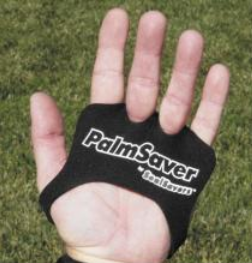
Another option is to pick up set of neoprene PalmSavers. They're sold in pairs, less labor intensive to use (just put them on) and provide more hand coverage.
At a minimum, radiator fluid should be changed once per year. If you race, at least twice a year. When you do this, it's a good idea to flush the system with white vinegar and distilled water (50/50 ratio).
After you've drained the old coolant, fill it up with the vinegar/water solution, run your engine until warm. Drop the solution and fill with clean water to flush the system. Drain the water and fill to the correct level with your favorite coolant. Do not overfill.
The acid in the vinegar does a good job of cleaning out the old coolant and contaminants but will not harm engine seals.
In terms of coolant, there are lots of choices and you can't go wrong using what your manual recommends. Most coolants are ethylene glycol based, so make sure to dispose of it where your pets (and young kids) aren't exposed to it. Because it's sweet smelling and tasting to them, they'll drink it and if they ingest enough, dead puppy or kitty.
I personally use Engine Ice. It's propylene glycol based, making it much less toxic to humans, animals plants, etc... and it's premixed with distilled water, ready to run with freeze protection down to -26 and a boiling point of +256.
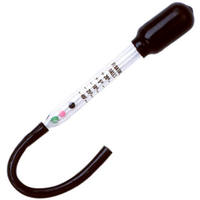
If you live where winters are cold and you choose not use a premixed coolant/antifreeze, be sure to check the mixture with a hydrometer. You can get them for cheap at just about any auto parts store. You simply suck up some fluid, count how many balls float and cross reference the number of the freeze protection chart.
Also, the specific gravity of ethylene glycol and propylene glycol are not the same, so make sure that you use the correct hydrometer. For example, Engine Ice claims freeze protection to -26, but an ethylene glycol specific hydrometer will read only to +20. Not a problem per se in this example (you'd still be well protected), but the other way around could be trouble. I've found that some hydrometers just don't specifically say what coolant they are for. However, most are for the more traditional ethylene glycol.
Hopefully this is of value to some and I've always had excellent results following these practices. May winter come late and that you log lots of happy, trouble-free miles.