REVIEW
I'll start by saying that I love my vario cases. They are perfect for the way I use the bike. I commute, in NYC. I need to stay narrow when possible, but have the extra space when necessary. In case you don't know, the cases expand to give you more storage (hence the vario name). You just pull an internal bar upwards or downwards to increase or decrease storage size. It's a very unique system. So for someone who commutes a lot, the Varios are a great option. Even if you are just touring, or camping, they are great. If you go off road often, or if you are never in the city, you would want tougher aluminum cases. If I didn't commute in the city, I would likely get the GIVI Outback Trekkers in black.
Having the same key for all 3 cases, and my ignition is very convenient. Being able to collapse them allows me to lane split in the city as they are barely wider then my handle bars. One negative about the varios is that my Shoei RF1200 helmet barely fits in the top case, and only when on its side. The good news is that it fits with room to spare in the right side case. I also prefer top loading side cases over side loading, but the benefits outweigh the negatives for me.
At this point my cases are a bit beat up. They've been through a lot and are handling it well. Besides normal wear and tear involved with city commuting, I've also slid my bike 20+ ft with one of the side cases taking most of the hit. Add to that the recent tip over parking accident. So while the outside of the cases are a bit beat up looking, they are still holding up great. Especially since I get to replace any damaged parts individually.
REPAIR
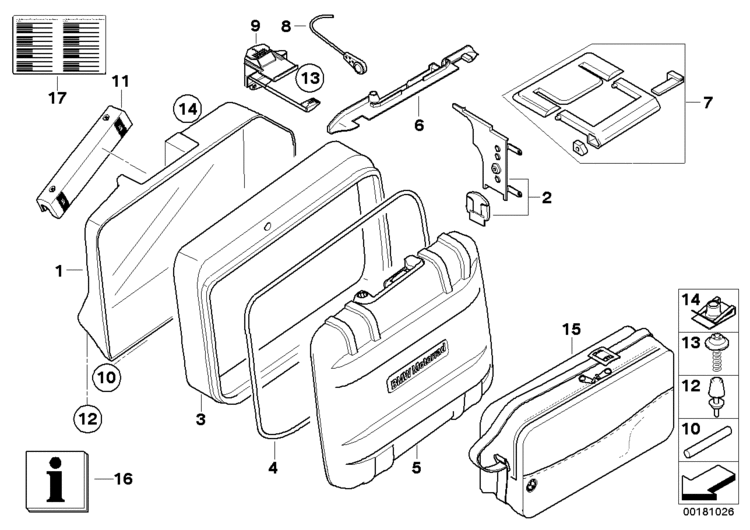
Meanwhile, on to the repair part of the story. It started with my bike getting knocked over while parked. A part broke inside, and I figured i needed new cases. After spending some time researching, I found out you could buy individual parts for these cases. Over 10 individual parts are available to order. I needed the "Adjust Frame". The part in the middle that supports the sliding mechanism. $85.50 instead of another $450 to replace the entire case.
The part came in and I started disassembling. I removed the screws connecting the adjust plates (the modules with the actual gear mechanisms) from the adjust frame. This allowed me to split the case in two halves. From there, I would just need to remove the front of the case from the adjust frame, and attach it to the new adjust frame. This is the first problem I ran in to. They are connected by a hinge on the bottom, and I just could not figure out how to remove the hinge axle to free them apart. I even called the BMW dealership i ordered them from and they did not have any advice. I ended up using a dremel to melt the plastic away on the part of the hinge that was attached to the adjust frame, since that part was going to be thrown away anyway. That worked, but it took me a few hours of trying other things first and then finally the dremel. I then had to use pliers and WD40 to pull the axles out.
Finally after getting them apart, I then attached the new adjust frame to the front case by lining up the hinges, and sliding the axle back in. I had to use a hammer to get it back in. Thinking the hard part was done, I then went to attach the two half of the case together. The problem was I couldn't get the top half of the case to fit together with the adjust plates. I had to remove the adjust plates from the bottom case, slide the top half of the case on to the bottom half, and then reinstall the adjust plates. To remove the adjust plates, i had to first remove the bar, then 3 screws from the bottom of the case. Once you remove the adjust plates, the gears are now visible and easily get out of sync. This is actually easy to set up correctly again, but it took me a while to figure that out. I'll come back around to that.
So I attached the adjust plates back in, screwed everything back together and tried the mechanism to see if the case would open and close correctly. It did not. This drove me crazy. I thought it was a complication with getting the gears aligned just so. I must have taken it apart and put it back together 5 or 6 times. Banging my head, getting really pissed off about it, researching it online. I couldn't figure it out. Finally I realized what the problem was. The top half of the case simply could not slide all the way in to the bottom half of the case, regardless of the mechanisms. I measured the inner depth of the old adjust frame and the new adjust frame, and the new one wasn't as deep. Something was inside. I took my flashlight and saw a rubber snake inside of it. They must put it in there just for storage and shipping purposes, to keep it from getting smushed together. I used small pliers to pull it out. A long rubber snake. That was it, I put everything back together and it worked perfectly right away.
The trick with the gears is that when you turn them all the way in one direction, one of the middle gears is able to turn independently from the other middle gear. Get it loose, and rotate them both all the way in opposite directions until they are at the end of their teeth, then match them up. From here you have to make sure that the middle gear does not get loose again while reinstalling the module. I used a pen on the outside of the module in the hole that the adjust pole normally goes in.
Through this process, combined with the process of doing some modifications below, I became fairly intimate with the inner workings of these cases. I am now fully confident in replacing any part, though I do dread having to deal with the hinge axle again. Any good advice on that would be appreciated.
MODIFICATIONS - RESEARCH
It turns out there are a lot of smart people out there tinkering with their cases. From adding shelves, storage nets, mirrors, and footman loops. There is a specific thread on advrider about vario case modifications. The one that I really wanted to do was add loops of some sort to the top of the cases, allowing me to hold extra gear on top of them. I spent a lot of time reading that thread over and over again.
MODIFICATIONS - BUNGIE BUDDIES
When I travel with my wife, two up, there is less room for storage. Especially because she insists on having the top case on, as she feels more secure with it behind her. After doing some research, I saw others putting smaller duffles on top of the side cases. Dry spec makes a great 28L dry bag that looks like they'll fit perfectly on side cases. I picked two of them up during a revzilla sale recently. I also picked up a package of bungie buddies, and some extra rok straps to help secure the bags to the side cases.
You really don't have many choices of where to mount the bungie buddies, and I made a few mistakes while figuring that out. Since the case adjusts in to itself, you can't put screws and nuts in that area. I had to choose the top of the outer lid. Even there, you have to find the only empty spot that will allow for the screw and nut to fit. I started by removing the "lock strip". At first I installed them on top of the two ridge platforms like I saw others do on the forums, but quickly realized that the ones on forums were for the R1200GS, and were slightly different. That location did not work on mine, as the lock strip wouldn't fit back in after that. So I made two holes on the top of the case that I later had to figure out how to fill in.
I had to put them on the outer parts of the top of the lid, where the lock strip would not interfere. It wasn't the ideal place, mainly because they don't look so natural over there. I used a 1/8" size drill bit, a little smaller then recommended. I then used force to screw the bungie buddies in, letting them create a new thread in the plastic, and keeping it really tight. I also added black silicone between the plastics to make it water proof and also to remove any odd looking spaces due to the curvature of the case. I inserted the washer on the under side, and was able to get my fingers in there to get the nut on. I used a needle nose plier to hold the nut as I turned the bungie buddy with my hand. At the end I did the reverse, holding the bungie buddy with my hand, while using the pliers to tighten the nut. I also used some of that black silicone to fill in those misplaced holes from earlier. I'm looking forward to getting those side duffles on. They bungie buddies seem really tight and I think they'll hold well.
MODIFICATIONS - TOP CASE BACK PAD
Less of a modification, more of an add on. This is a BMW part, but because it's a bit complicated to install, I consider it a modification. My wife has been asking for this since she started riding on the back with me. Since we are taking our first weekend away together on the bike, I figured she would be happy to see this.
I couldn't find install photos online anywhere, so hopefully this will help someone. First note, the instructions are for the R1200GS and are mostly useless here. You need to disassemble the lid of the top case. The lid is actually two parts, and you have to remove the outer shell of the lid in order to drill the top pad on, which includes removing the lock strip. Once you get it open, you'll see two circular markings that you need to drill open. After that, its easy. You just thread two screws in, making sure your alignment is correct. Put the top case back together and you're done with that part. The lower back pad is less complicated. You just align it, and thread two screws in from the bottom upwards.
INSTALL + CLEANING
Original install post here. I also wrote a post a while back on cleaning these cases. It involves alcohol pads, and a magic eraser.


Recommended Comments
There are no comments to display.
Join the conversation
You can post now and register later. If you have an account, sign in now to post with your account.