Leaderboard

Popular Content
Showing content with the highest reputation since 12/17/2014 in Articles
-
CRE race track experience! Time, 05:15 h. My alarm clock rings and it’s time for me to get my breakfast in my stomach, take a shower and jump on my bike! The 1,5 hour drive to the TT race track in Assen took me to the TT junior track and the CRT Holland training ground for the CRE track training. Here I met with 37 fellow Suzuki riders. Greeting us where the men and women from Suzuki Motors Holland who set up this training day. Briefing Before we could start melting our tyres and scratching our footpegs on the asphalt. We needed to get a safety briefing. This CRE safety briefing included the meaning of the different flags that signal what you need to do on the track in case of any changes. Also they told us not to stop to help someone who crashes. This felt kind of unnatural to me but it made perfect sense. Better to have one person on the ground then a whole pile up on the track. After being set to the proper mindset, CRE gave us our rider number. 60 blue was my sign. They put us in 4 different groups coded by colour, for the training on the Junior Track. This part of the day was there to make us proficient in cornering. It also made us explore the capabilities of the bike. TT junior track The junior track is a way smaller but way more corner intense track than the actual TT track. The track consists of a South and North loop. These loops are riddled with corners and turns which will make you flinch at first glance. The CRE instructors take you round and around the South and North loops. Turning the flinching into smiling! In total you’ll ride 8 stretches of 10 minute rounds. CRE instruction proves it’s worth! Photo by: wegraceinfo.nl After about 5 minutes the CRE instructor gets off and you have to find your own perfect lines and curve entries. This really makes you think about the cornering, throttle and braking. And this makes you better! I personally went from 0.659 degrees decline to scratching my footpegs around the corners in about 2 rounds. So this means you still have 6 rounds of 10 minutes to train your new skills. The CRE instructor gives you personal feedback on your riding style and this makes for a good ride all day long! He told me, that if I wanted to keep some pegs to stand on, I should lean into the curve more with my body. He told me to sit on the side of my saddle. If I felt like Rossi or Marquez, I should even lean in more. But! Never exceed your comfort zone to much he said. The CRE instructor motto: “Push the envelope, but keep it fun and real”. The Big Track After nice lunch, we enter the afternoon CRE programme. This included a little bit of theory about the TT Assen Race Track, and another safety briefing. Directly after that we were sent down to pick up our transponders and let them get mounted on your bikes. These transponders send back your laptime but also monitor your Decibel output. Legally on the TT you are only allowed to ride with an exhaust that emits a maximum of 101Db. If you exceed this they will flag you with a black flag and end your trip with a heat-seeking missile. Before we could enter the track we needed to split up again in groups. At the Parc Fermé we arranged these groups and we were the first ones to ride! I followed my CRE instructor onto the track and started slamming my V-strom into the track curves. Photo by: wegraceinfo.nl But sadly, as good as my high seated, broad handlebar and manoeuvrable Strom handled on the Junior track. It wasn’t powerful enough to reach any real speed on the track. I thought this would get boring then… But man was I wrong. Fun all over! Finding the ideal line of entry, exiting curves full power and ramming through chicanes at 90 km/h. Awesome! Strubben At the TT race track I found my Nemesis. The curve called Strubben. The first few tries it bit me hard. I couldn’t get the right angle, speed and driveline to get through it. But with some coaching from the CRE instructor and my fellow riders, I was able to get it done! I can’t imagine how they do this with speed exceeding 100-200km….. Verdict: Satisfaction It was a very long and very intense day. My legs hurt, knees ached and my back is blown. But it was all so satisfying. I’ve learned to trust my bike that much more now and above all.. I trust myself more. I for one, am now a lot more confident on my bike. Both me and my Strom can do so much more than I thought. I can recommend a CRE or CRT training to anyone. No matter what bike you ride. You don’t have to be fast or take the corners the best. You just have to be the best you can be on your own bike. Video of V-strom on Race Track.3 points
-
 How do you pack for an extended overland motorcycle trip as a woman? We all know that guys are willing to turn their undies inside out – repeatedly-, and will wear a shirt till it is basically paint-stripper in order to keep packing light, but I don’t think many women are willing to go that far. I LOVE traveling, but I also usually never pluck my own eyebrows (it always goes badly wrong), I go for regular waxes, love to get facials, and I cover my ever expanding range of grey hairs (I blame my husband and trip-planning) with hair-dye at the local Hyde Park Salon. My first overseas trip at the age of 16 saw me take a suitcase for 14 days travel that I couldn’t pick up myself… Despite the above, however, I am not a girly-girl and think I can easily adapt to travel without the above luxuries. Here is what I packed for our 12 month plus overland trip on two BMW F800 GS motorcycles, never having attempted a trip like this before. The list does not include our shared medical kit, camping gear, kitchen or toolkit and is only my gear: what has worked and what hasn’t after 4 months of travel. I am sure in another 4 months it may look very different, and I will do another post closer to the end of our adventure. What I love: 3 garment mesh bags of various sizes, made by Sea to Summit, and sold by Adventure Inc: Matthew initially teased me about these, but they have also proven to be one of the best things we bought and take up no space. You can use separate bags for pants, tops, underwear or a combination, and they greatly simplify your daily packing and unpacking. They have also become extremely useful as camp pillows: They are both soft and the perfect size and thickness. Toiletry Bag: Cause we all know that when your toothpaste leaks you don’t want it between your clothes. Deodorant: I picked the non-spray version as it lasts longer. Dermalogica Face Cream: This is good cream that I had at home and wanted to use for as long as possible on the trip. No plans to replace it when it runs out, but so far it has lasted me 4 months. You have to take care of your skin, especially your face. SPF 50 Suncream for your face, supplied kindly by the Fourways Aesthetic Center: The sun is strong and sun-damage is not reversible. This small tube has protected my face every day for over 4 months and is still going, where in South America the UVA exposure is often above 13 (extreme). I haven’t burnt once. Disposable razors: Because waxing is not a viable option. Toothpaste and Toothbrush Toothbrush cap: Matthew teased me for this too but it has proven to be more than useful and takes up no space. Great not to rest your toothbrush on a gross hostel basin, and you can put a wet toothbrush back among your things. Nail file: Because nothing is more annoying than a nail that hooks on gloves, hair and clothes. Tweezer: Has multiple uses from removing splinters to plucking eyebrows Nailclippers: This set is shared between Matthew and I Small scissors: Multitude of uses from cutting open packages, bandages, trimming beard hair (not mine) and eyebrows. Assorted hair elastics Small tub of cream for hands and elbows Perfume: small bottle of perfume that I admittedly rarely use, but I love that occasionally I can smell great, and I can’t part with it. Small MAC concealer for emergencies: Same as above Dermalogica Face wash: Left over from home supply now finished and the bottle has been recycled for pepper in the kitchen. Dermalogica Face exfoliant: Still going strong Conditioner Shampoo Anti-chaff cream: a saviour! Especially on the F800’s seat SPF 30 suncream for your face: An extra I packed but have not needed to use yet, could do without, but I keep it in my Tank bag Another small tube of cream for a pocket or tankbag: I took a few small ones, rather than one big one, but have recently decided to rather carry a big one we share and leave the small ones. Cashing in on assorted free samples I have collected Baby powder: This is a saviour for chaff and days when you cannot shower. Vicks Vapo-rub: Sorry this belongs in medical Floss: always essential for your teeth, for sewing clothes or for emergency stitches. Assorted lipbalms: these small Zambuk’s from South Africa are really small, they last long and also work wonders to relieve itch from mozzie-bites The smallest hairbrush I could find: If you think this is a luxury you have never ridden a motorcycle with long hair – birds-nest comes to mind. Two small body washes – one for Matthew and one for me. Now we just share from one bottle. Assorted Tampons and pads: These are personal preference, and I have had no problems replacing both in South America. Remember that in Africa in the rural areas you will rarely find tampons, and that their use is also dependent on your own hygiene. Please carry a small plastic packet for their disposal – you do great damage by leaving these in nature. Arnica oil: We threw this out after not using it for a month and trying to reduce our load, then two days later needed to buy some more (Not vital for everyone as anti-inflammatories do the same job, however Matthew cannot take those and therefore Arnica is our only option) Flixonase nasal spray: actually for medical but I carry this with me to ward off regular hayfever attacks. Mosquito repellent: Citronella repels mosquitoes but not strongly and especially little in the open air, so if you travel to areas with Malaria, Dengue or many bugs get something with the active ingredient such as permethrin. We bought this Vital Protection at the local pharmacy for R120 (±$11). It even repels spiders (tested myself, not advertised)- vital for me. They also have spray for textiles and even a wash for clothes, where it lasts for 3 months! Wet-Wipes: moistened towels that serve in place of a bath or shower and many other uses. Travel book: This small book is where I keep our insurance details, the contact details for important people and all the details for the people we meet on the road. Travel sewing kit: I have used this kit more than I would have liked, and just added some larger needles and thicker thread. Pair of tights: I have often worn these, including under my motorcycle pants in the cold. They are now too big for me and riddled with holes. I will be replacing them soon. Pair of shorts: I didn’t end up taking this pair (they are white) but bought a pair on the road when the temperature went up. Thermal underwear: These were not the best and after freezing in southern Argentina, I threw them out and invested in a decent pair of thermals that are also smaller and lighter. Don’t cut corners on thermals if you will be riding in the cold. Two bra’s and one sports Bra- I save the sports bra for off-road riding. Muggers wallet: I use this small cheap wallet to hold dud cards and some small change Pretty headband: Love this Fleece top: I took a fleece I bought in RSA on a cold ride in Dullstroom. I love it and it is great under the riding jacket – please note my jacket does not have a warm layer. Small pullover jersey: to wear off the bike Pair of Kevlar jeans from X-Kulcha: These have served me well and double as jeans for around town. They have made a range and these “skinny” jeans fit well and are strong, they also don’t look like riding jeans. Pacsafe: This is usually a backpackers item, but has become a bike-lock on our trip. It is long enough to lock our two BMW’s together and we do so every night, even behind locked gates. Underwear: I have taken 2 pairs of recommended Bamboo underwear that reduce chaff, don’t migrate and last long. I am not disappointed. I did however add a few pairs of cotton underwear and the total is 6 pairs. Tops: 1 x longsleeve top, 1 x spaghetti strapped white top, two vests, two t-shirts, 1x black long fitted top and 1x shirt. These cover for a range of climates, however white is a bad idea as I cannot keep it white. The black long fitted top has been my best so far. 1x pair of leather motorcycle gloves from X-Kulcha: I wear these every day, and though not waterproof, they have proven both comfortable, hardy and surprisingly windproof. I am really impressed by these gloves and will buy them again. 1x microfiber towel: These are great space savers but I have lost mine and now use a facecloth. I have one complaint and that is that after a certain period of use these microfiber towels develop an odour that no amount of sun-exposure or soaking can erase. Mosquito net for face and head: We bought these cheap nets on recommendation from travellers who have been going for over 11 years. We thought them really dorky at first, but are so glad we have brought them, we use them often Glove inners: one set of warm glove inners are vital for the cold. 1 x set of gloves for off the bike. These are fingerless gloves that double as mittens from K-way South Africa and are the best I have ever owned. Bikini and sarong Motocross socks: Three pairs of motocross socks have worked perfectly in wash rotations (especially when the weather takes a few days to dry a pair) 1x neck warmer – a fleece neck-warmer that can double as a beanie. I love it. Also from X-Kulcha South Africa Assorted socks: to wear on hikes and around town. I have 4 pairs. Assorted Buffs: I have taken 4 buffs and one windproof buff from Adventure Inc. with me. Their uses range from keeping the hair out of your face, to keeping bugs and wind off your neck and even as emergency hair elastics, towels and visor cleaners. I also wrap these around my camera in my tank bag to keep the camera cushioned. 1x small dress: this lightweight dress is packed for the extreme summer heat – which I have so far only seen in Mendoza and the Atacama Desert What hasn’t worked well: A: Rain proof outer gear for riding – This set of plain, plastic worker’s waterproof overs were recommended by a number of people. They served well to keep me dry in a few rain-storms and then the plastic wore at the seams and they were no longer waterproof. For shorter trips they may work, but not for extended travel – unless they can be regularly replaced. I also had to cut the bottom of the pants to fit over my riding boots. It has been 2 months and I have not yet managed to replace them, despite visiting every fishing shop in Chile. B: Hairband for when showering and washing face: I have thrown this out as I never use it, and Buffs do the same job. C: BB Cream: I also hardly ever use this, and my skin is finally clearing without the stress of a regular job. I haven’t parted with it yet, but will very soon. It is time. D: Anti-dandruff Shampoo: I would not have packed this if I knew how easy it was to find Head-and Shoulders E: Small bag of anti-oxidant treatment for skin regularly exposed to the sun. This was supplied by a friend in large quantity and we have had to cut down, but I am still using these vials in place of face-creams. F: Corega effervescent tablets: These were important for me to pack as I use a bite-plate due to grinding my teeth at night. I have subsequently stopped using the plate, and have thrown these out. G: Small flat mirror: a gift that cracked within the first few days, which we tried very hard not be superstitious about. Not necessary to replace as there are mirrors on the bike – if you really need one. H: Thick warm Hoodie : With much regret I had to get rid of this hoodie. It was too big and heavy, and did not provide enough warmth. I hope a lucky backpacker adopted it. Not seen above: All Terrain Gear Soft luggage 50L (seen below): This awesome bag is waterproof, dustproof, bugproof and hardy. It comes in a variety of bright, high-viz colours and has reflective detail. A strong feature are the large number of D-rings and other areas to tie things to. We leave this bag outside the tent under the rain cover and just close it at night, where it has often stood in water overnight with no problems. Cap from Country Trax made by X-Kulcha: to protect me from the sun off the bike 1 x pair of Sidi Motorcross boots: Despite all the discussion about comfort of motocross boots on long adventures, I have worn mine for longer than the first 4 months of my trip and find them extremely comfortable. They have also served just fine for walking around towns to look for places to stay, though you look a bit hardcore. I have walked through shallow water without them leaking, but at speed on a bike, in heavy rain, they are not waterproof. However I consider my legs more important and will not ride without the articulated ankle and full-length protection – as they already saved me from a fracture 3 weeks before we left on our trip. This is the bruising from the redistributed force… Leatt Adventure Jacket: This amazing Jacket fits the Leatt neck brace and is fully waterproof to the top of your neck. I have found it comfortable to wear, well ventilated in the heat and windproof in the cold. It is filled with many pockets and hidden pockets, in both the waterproof and outer layers. It is however lacking a warm layer and I have had major problems with the main zip, a weak point of the jacket, which Leatt is aware of, and promise to rectify in future models. I will definitely use this jacket again in the future. Leatt neck brace: This neck brace has thrice saved Matthew’s neck (once on this trip when he hit a rock in the loose sand at speed in Iquique), and neither of us will ride without one, even down the road to the shops (ATGATT!). The new braces are so low profile that you don’t notice you’re wearing one. X-Kutcha Dakar riding pants: These pants have worn well over months of travel and are very hardy, looking brand new after every wash, so much so that it’s a bit spooky. They have reflective details, dry extremely fast, don’t smell at all and are made from tested Kevlar for protection. However they lack waterproofing, wind-proofing or a warm layer. Hard knee protection also had to be added after market. Earplugs to protect from the noise: we use the MotoSafe range, bought from and recommended by Touratech South Africa and find them comfortable to wear over long distances.. Salomon XA Pro 3D GTX shoes: These versatile, waterproof and durable shoes fit well into my adventure. When I get off the bike these are what I wear from walking around a town to hiking Torres Del Paine. As a doctor these are all I wear on 36 hour shifts too. Highly recommended and there is no equal. Flip-flops (sandals): I carry a pair of havaianas that are durable and comfortable Added on route: Down jacket: I added a down jacket to my kit in Southern Chile after riding in average temperatures below 5 degrees C. I have never regretted it and it stuffs really small into its own stuffsack. Waterproof outer shell: a Thin waterproof jacket to protect the down when off the bike and for walking around town. The windproof aspect also really helps to conserve heat. Aqueous cream: In the very cold and the very hot, it is difficult not to use a moisturiser. This cream works best as it is free of perfumes and other additives and can therefore be used as a face cream too. Especially in the cold I struggled with cracked fingertips, a seemingly minor problem until you develop it and you struggle to strap your gear to your bike for the pain. SPF 30 Suncream to use on our bodies and can also double as a moisturiser – though not a good one. Two facecloths to replace my lost microfiber towel. In-ear ear-phones: we bought at duty-free in Chile. If you really get in-ear phones you can hear your music or partner while riding on highways or in gale-force wind, without any discomfort from the helmet. We use them with our Sena Bluetooth kits to chat or listen to music. We never got these before we left and I regretted it everyday till we found some in Chile. All the above packs into my ATG duffel bag If you thought by now my bike looked like this: It actually packs to this:2 points
 -
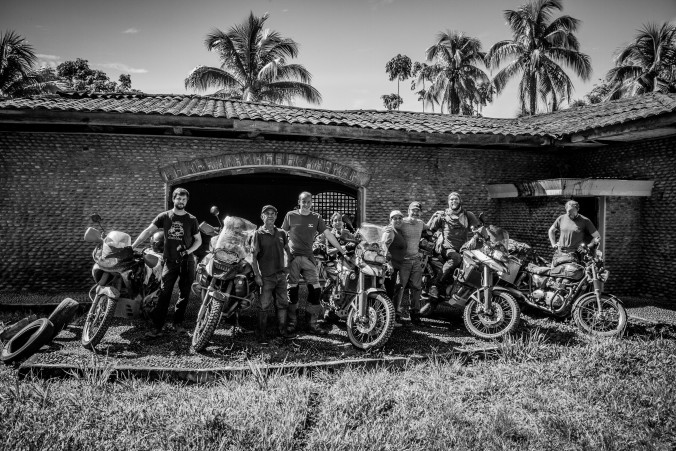
Trip Report - Riding Bolivia (Editorial note: Some text that follows was lifted from the published itinerary so attribution in advance to Phil Freeman (MotoQuest) and Cory Rowden (BoliviaMotors)) In early 2016 Phil Freeman at Motoquest invited a bunch of known riders on a scouting trip to Boliva in partnership with Cory Rowden of BoliviaMotors. Scouting trips are where a tour group has drafted a route and itinerary but hasn’t yet ridden the whole thing and wants to understand what a scheduled trip might be like in that area. Known “Plan-B” riders are invited to fill out the trip and manage the costs. Plan-B riders are all like “Well we have a flat tire, we’ve just ridden through a forest fire, and we’re lost – so let’s do Plan-b!” On a serious note, everyone on a scouting trip needs to be relaxed, self-reliant, and ready for any change in plans. On that note, let’s begin. What follows are my notes and observations, mixed in with the written itinerary provided by Motoquest/BoliviaMotors, so editorial attribution should also go to Phil Freeman and Cory Rowden. We were going to be riding Suzuki DR650s (with electric start) and BMW 800GSs. I know this is an XLADV forum but this story is about the route rather than the bikes and anything we rode was doable on a large KTM or BMW, unless notes. Getting the Bolivian Visa ahead of time involved sending my US Passport to the local consulate with the fee, a self-addressed return envelope, and a lot of patience. I’m told that tourist Visas are available upon arrival if you have the $160 cash in clean, crisp, undamaged US notes – some of the other riders who flew into Santa Maria did it that way. I flew from California into La Paz on Friday a couple days ahead of time to acclimate to the altitude. La Paz is the highest international airport in the world at 13,000 ft. www.motoquest.com www.boliviamotors.com I coordinated to meet a riding buddy of mine in La Paz, Craig from Missouri, and we tooled around the city for a couple days with some local FIFA contacts he had. https://en.wikipedia.org/wiki/El_Alto_International_Airport On Sunday we flew from La Paz into Cochabamba and met the rest of the riders, guides, and mechanics. Day 1 – Sunday, November 6th, 2016 Arrival in the city of Cochabamba - https://en.wikipedia.org/wiki/Cochabamba Phil picked us up in a very classy Hawaiian shirt from the airport and we met all the other riders and mechanics as they arrived at the hotel. Before dinner we also took cabs over to the BoliviaMotors compound, checked out the bikes, and went for a quick ride through the city and up to some spectacular viewpoints. Plan-B: One flat and one drop for the group. Day 2 – Monday, November 7th, 2016 Cochabamba – Comarapa (160 miles) https://en.wikipedia.org/wiki/Comarapa Day 3 – Tuesday, November 8th, 2016 Comarapa – La Higuera (105 miles) Lunch at Valle Grande. This is where the Che Guevara route starts and we visited the hospital laundry where his body was laid out to show the world he was truly dead. We also visited the location where his secret burial site was and the new mausoleum built to honor Che and his comrades killed by the Bolivian Army in 1967. Spent a rainy night in the tiny village of La Higuera. This is where Ernesto ‘Che’ Guevara was held and later assassinated. https://en.wikipedia.org/wiki/La_Higuera This is the location of the actual schoolhouse where he was held and executed. We dined and slept at the telegraph compound where Che’ supposedly sent his last telegrams, allowing the Bolivian Army to pinpoint his location for eventual capture. Placed my Mosko Moto 40L duffle here for a pic. This bag, a gift form my amazing wife, was indispensible for lugging gear through airports and up narrow stairs at 14,000 ft altitude. Just pull on the shoulder straps and walk – never taking a standard roller-bag again. http://mosko-moto.myshopify.com/products/backcountry-40-rear-duffle Day 4 – Wednesday, November 9th, 2016 La Higuera – Sucre (180 miles) Pretty amazing riding day on a road described by adventure riders as “one of the best adventure riding roads in the world”. Rode pretty good paved roads into Sucre – a UNESCO World Heritage Site. Altitude 9,000 ft. https://en.wikipedia.org/wiki/Sucre Day 5 – Thursday, November 10th, 2016 We spent the day in Sucre and visited the oldest silver mine in the Americas, as well as the government museum. A great day to rest and relax. Day 6 – Friday, November 11th, 2016 Sucre – Potosi (100 miles) Wonderful paved roads into Potosi. Some of the group went and toured a working silver mines of Cerro Rico and they all regretted the experience of crawling, climbing, scrambling up and down sketchy underground pathways and being in the mine when dynamite was used further down. I don’t have pics of this but I’ll try to find some. Day 7 – 9 November 12th through 14th, 2016 (My timeline is a bit hazy here) Potosi – Uyuni – Oruro (Hundreds and hundreds of miles) So Uyuni was indeed a highight. This is on the Dakkar route and the Solar de Uyuni salt flats is one of the wonders of the world. We rode out onto the 4,000 square miles of ancient salt lake to some islsnds for lunch, then back for a dinner and overnight at a hotel made of salt. Must be seen to be believed. What follows was a combination of dirt roads, some awesome ascents, valleys, dry riverbed crossings, and finally a nice highway into the city of Oruro, which is considered to be Bolivia’s most indigenous city. Day 10 – Tuesday, November 15th, 2016 Oruro – Quime (105 miles) So now we ride up and over the Andes form the western alto-plano region east intot he Amazonian areas over a summit of 15680 ft. Day 11 – Wednesday, November 16th, 2016 Quime – Chulumani (100 + miles) A long and hot dirt slog day. After descending into the Amazon rainforest on winding, narrow dirt roads into the lowlands of Bolivia. This was a very long day up and over mountains, through valleys, dodging slash and burn agriculture that got out of hand, trying to pass trucks on silty dusty mountain roads, and then up and over the next mountain. And then the next one. Many flats and breakdowns (electrical) today but the Bolivian chase truck caught up to everyone of us. The video is a little glimpse of the exhaustion, heat, and elevation. We stayed overnight in Chulumani. Day 12 – Thursday, November 17th, 2016 Chulumani – Coroico (60 + miles) More upper reaches of the Amazon rainforest riding a little used dirt road between the two Yungas towns of Chulumani and Coroico. Lots of coca leaf cultivation. Day 13 – Friday, November 18th, 2016 Coroico – La Paz (40 epic miles) Road of Death in the rain and fog. Video should give a little insight into this spectacular day. A couple breakdowns today (chain sprocket on Angry-Ian’s bike, and a non-injury low-side in the rain by Happy-Ian) and very cold, but awesome and one of those life experiences that you'll remember for the rest of your life. So an epic trip and I probably didn’t do it justice here because I’m not a writer, but if you have any questions let me know and I’ll try to fill in the rough spots. Gregory Grabowski R1200GSA1 point
-
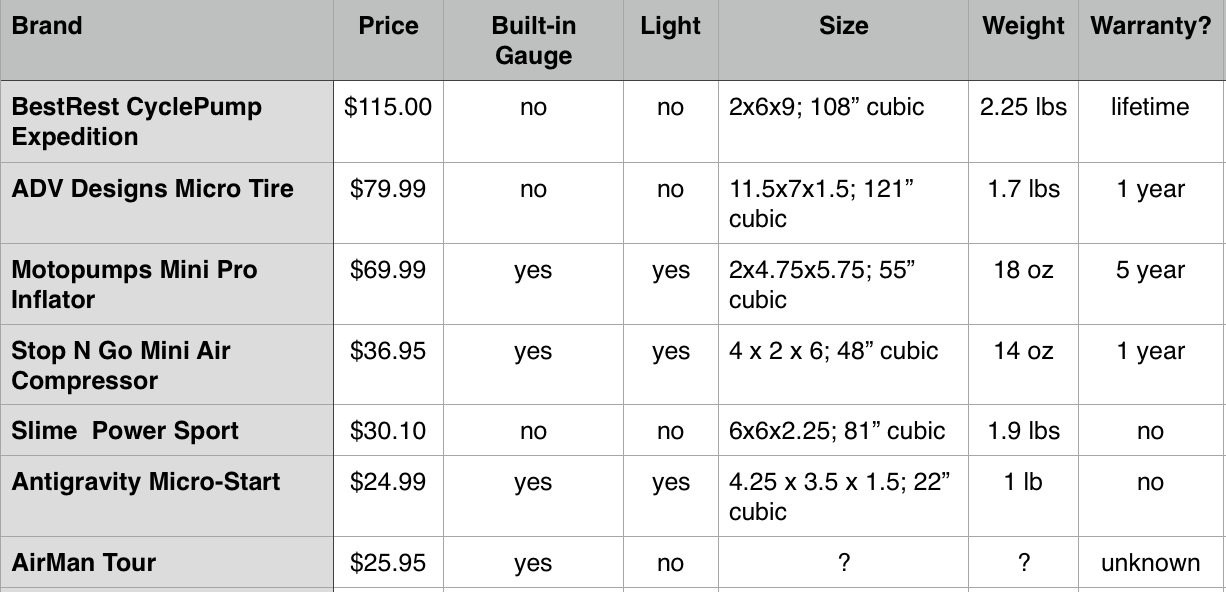 Motorcycle Tire Pump Comparo: The Top 7 Pumps for Your XLADV Motorcycle Portable air compressors have come a long way and now there are quite a few that are purpose-built just for us motorcyclists. Some have even been purpose-built for XLADV motorcycles as you're about to see. Thankfully we have a plethora of products to choose from and I'd say perhaps too many given some out there are obvious ripoffs of earlier innovators' designs. I've left those pumps out on purpose so if you see it here, you'll know you're likely to get an original and be supporting real XLADV motorcycle riders. I did learn quite a bit from some of the makers of these pumps so let me give you the 411: Yes most components are made in China but they've come a long way and are the best you'll find. Many are still assembled here in the US and are American small businesses you can trust. Most any pump will have heat issues. They're great for your own bike but most require a cool down period before you start to inflate a second tire. Most any pump is going to trip BMW's canbus system and will require a hard wiring to the battery for best results. They start fine but will trip once the pump is under load. A lot of the lower priced pumps work great but have shown poor reliability and are prone to breaking if dropped on a hard surface. All these pumps should be kept out of the dirt. A best practice is to hang off a peg or place on a mat or case the pump comes in. All will inflate your tire to about 40 psi in about 6-9 minutes. I can't really say which is the best pump out there; that's something you're going to have to figure out for yourself. But, I did think it would be fun to break these pumps down into sub-segments for a few well known ADV archetypes: The Starbucks Rider, The Hardcore ADV-Enduro Rider, and The Budget Conscious Rider. The Starbucks Rider You strike quite the figure in that genuine whale foreskin suit and that $30k top of the line behemoth XXLADV bike as you sip your latte and give knowing winks and finger-guns at your local coffee shop. Okay, so that's a bit over the top. Just a bit of fun! This type of rider really doesn't mind what a pump costs; they just want the best and will go with what they saw someone else have in their aluminum box style panniers. CyclePump from BestRest Products - $115.00 The CyclePump seems to be a popular pump ("30,000+ sold") and at $115 it's the most expensive in this comparison. I had a first generation version of this pump and did not have a good experience with it. But to their credit, they've continuously improved their product with a new chuck design, new housing mounts, subtle improvements in the compressor, and now rubber armored end caps. Despite the high price point, this pump does not come with a light or pressure gauge and is the heaviest and largest pump (XXLADV) in this comparison. (photo by Noah Horak; used w/permission) The Hardcore ADV Enduro Rider This rider is going purely on function and will spend a dollar if it means they're ensured of reliability when it counts. They don't care about plastic housing or maybe lights or gauges; they just need something that's purpose-built and going to work when they need it to. ADV Designs Micro Tire Pump - $79.99 The Micro Tire Pump is the product that started it all for ADV Designs. They set out to build the best motorcycle pump and tested many of the cheaper pumps finding that 50% of them failed! They found the best compressor motor available (used by a few others as well) and went for a function over form approach. Sure, it may look like it's from the former Soviet bloc but it's very popular and works well. They also won Overland's editor's choice for best value back in '08 and comes with a 1 year warranty. Motopumps Mini Pro Inflator - $69.99 Motopumps is another product created by a motorcyclist frustrated by three flats in 6 weeks costing him $380 in towing! He saw there weren't any good motorcycle pumps out there and set out to make his own; also using the best components: campbell pump; teflon coated pistons; metal gears; high air flow and more efficient (more air/less amp draw). The Mini Pro also comes with a 5 year warranty! They have a new Air Shot pump ($59.95) that is even smaller and lighter. The Budget Conscious Rider This rider is more likely to have a milk crate top box and a homemade camp stove made from an aluminum can. They get the most adventure value out of their dollar not because they are "cheap" but because they derive satisfaction out of seeing what they can accomplish for the absolute lowest amount of money. This rider's pump is going to be very affordable as well as very small and not necessarily have all the bells and whistles. Stop N Go Mini Air Compressor $36.95 I've seen many of these pumps out there and they seem to get the job done very well. It's made from heat resistant plastic that is claimed to not overheat. What's cool is even at a low end price it still comes with a built-in gauge and led light! Slime Power Sport - $30.10 This may be the most ubiquitous pump as it seems to be everywhere. Lots of people have it, but it's known to be a bit fragile to dropping and is also known to overheat and require a 20 minute cool down cycle after 9 minutes of use. Antigravity Micro-Start Tire Inflator - $24.99 I happen to have used this little guy (the smallest and lightest) for two years now with no trouble at all. Like the Stop N Go, it also comes with a built-in gauge and led light. It also works with my Micro-Start XP10 battery as well! AirMan Tour - $25.95 The AirMan is another one you tend to see a lot of motorcyclists carry. I like the built in gauge as well as a deflate button. Decision Time! So which of these pumps do you think works best for you? If you have experience you want to share we'd love to have you write your own product review here. Pump Comparo Chart:1 point
 -
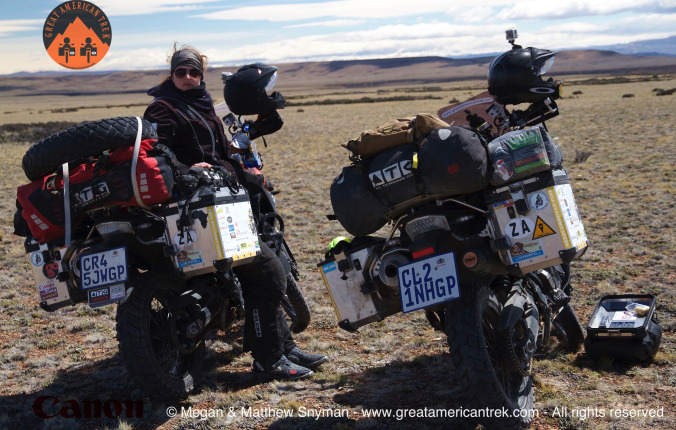
 Are you a real adventure biker or just a shameful, charlatan and pitiful fraud!? Recently there has been a generous amount of violent disagreement pertaining to the definition of adventure biking. What makes it ‘adventure biking’? Is it the type of bike? Is it where you ride it? Do you have to camp? Do you have to leave the country? Well good news is here! I can help! I have managed to define adventure biking, and I have decided to impart this ground-breaking knowledge unto you. The water is now clear and all is well in the jungle, ‘order’ has been restored. Through thorough, highly scientific, and precise collaboration, and under the influence of a range of substances, my carefully assembled dream-team of adventure bikers has managed to formulate a decisive list. This league of extra-ordinary gentleman (and gentle… women) originate from a host of different countries, and from all walks and crawls of life. “Home’ ranges from Africa, to Turkey, to Italy to ‘I’m pretty sure I’m from Arizona’ and many more. Washed and unwashed, veterans and rookies, holiday makers and hobos, even going so far as to include one Honda rider (but not two); all opinions were carefully considered and peer-reviewed. I present you with this new modern marvel, a first for world peace and what I hope to result in a Nobel prize: YOU ARE AN ADVENTURE BIKER IF! : You have said at least once: ‘I’m sure somebody will drive by soon’ You’ve put your bike on a boat (essential) You consider, with great deliberation, whether you really need a third pair of underwear Your motorcycle and the term ‘resale value’ are mutually exclusive You have caught yourself viciously bargaining with people over US$ 10c on repeated occasions You have a picture of yourself with some guy in military uniform and a floppy hat holding a massive automatic weapon (essential) You can tell the difference between 85 and 90 octane by smell A local has informed you that the road was completely flooded or a bridge had been washed away, but you still had to see for yourself… after trying to convince them otherwise Yeah, I think the bridge might be out... You have lost luggage off the back of your moving motorcycle It probably came off because you packed it like THIS You’ve been carrying the same 500g bag of rice 1 meter from your body for the past 3 months and will carry that same bag of rice for the next three months You have had to ride through herds of animals (essential) – extra points if they are wild animals Martin from TR15A rides past a herd of tarted-up alpacas You speak to other motorcycle travellers about buying tires like they are hardcore drugs e.g. ‘I heard you can get Pirelli’s really cheap from this guy Jorge in Medellin, he has the really good stuff’ A one-way street means NOTHING to you. Or a pedestrian-only market, those also mean nothing to you You have sneezed viciously and messily inside your helmet and just kept on riding Your GPS has repeatedly tried to take you up and down flights of stairs, and every time you still catch yourself looking up the flight thinking ‘I reckon I could pull it off…’ You have eaten something which is considered a pet in most developed countries Mich about to dive into some tasty guinea pig You hide valuables inside your boots because no sane human being with even the slightest stitch of self-respect would dare to venture near them You have packed you entire kit before realising you forgot some crucial item, after which you seriously consider just leaving it behind and buying a new one because its such a damned mission to pack They have had to wash the actual wash bay after cleaning your bike This was one of those times You can intimately describe over 20 different types of mud… by taste. This mud tasted like regret You have spent time editing high-level media on vastly inappropriate hardware in a ridiculous surroundings Megan editing RAW photos on a Macbook Air whilst stealing electricity from a street-light in an abandoned park, just another night on the road You’ve convoyed with cyclists for security reasons You’ve trusted someone to guard your bike who has an annual salary of less than a month’s gas money You’ve matched letter shapes with those on a map because you have so little clue of the native language You’ve convinced yourself that your GS actually handles really well on sand (mine actually does though) See? Perfectly capable in the sand You’ve listened to, and agreed with opinions contrary to the Geneva convention merely to satisfy your drunk host You can turn any conversation (including political or religious) into one about motorcycles in under 30s You have mastered the ability to eat any known food group through a full-face motorcycle helmet You can fart whilst riding sand and not shit your pants You haven’t seen an original official document in over 3 months Half the resale value of your bike (not saying much, see point no. 4) is hidden in the frame You have ruined a dorm room for all the other inhabitants And this is just me on my own in my own room, imagine two of us with five other people in here... You have become completely comfortable with your body odor after 5 days without a shower You have viciously panel-beaten a pair of expensive panniers with the back of an axe You have received the advice: ‘I think you should see a doctor about that’ You have waited out a bribe by dodgy police for over 40min because you were merely too stubborn or poor to just pay the bastards You’ve sat on a disgusting toilet seat thinking that’s its probably cleaner than you anyway At least 35% of your motorcycle’s dry weight is made up of cable ties and duct tape You have performed major surgery on your bike, in the middle of nowhere, possibly in the rain, with absolutely no trainingPeru... my faultChile - also my fault Because of the deplorable state of it, you have asked a local if you could please NOT use their toilet and use the garden instead. Which for one of the panel, resulted in them having to relieve themselves off a bridge. He felt you should know this… You have gotten into numerous very awkward situations because you don’t speak the language, this includes ordering ketchup for your french-fries and being presented with a beautiful bowl of hot tomato soup instead. You have crossed more than one international border with forged paperwork or a fake number plate My numberplate has taken a beating - still the original one at this stage, or what's left of it. It is now a laminated piece of paper that is impossible to read You have attached an over-sized, highly overboard weapon to your motorcycle Readying the weapons! Sharpening up for the jungle with newly acquired machetes A secret, well disguised, mutual hatred of backpackers You have provided smiles to numerous poverty stricken children by seating them on your still-running bike (essential) Mich takes a young'n for a joyride in the Selvas You have unsuccessfully fixed a puncture more than once Sweating like a champ to change an inner tube in the desert You have crossed an abnormally large body of water on your motorcycle without testing the depth beforehand You have contracted severe, life-changing diarrhoea on a big riding day or on the top of Machu Picchu You drop your bike at least once a week, and something breaks on it at least once a month This is a REALLY common sight MOST importantly of all, and the only absolutely essential item on this list: You are an adventure biker if you KNOW you are absolutely rad whenever you are on your bike, and wouldn't have it any other way Ladies and gentleman... Mr Ed Gill Now please people… this is a work (of ART!) in progress, so if you have anything to add, please let it be known in the comments section and it will be met with serious consideration to be added to the list. Although hard to believe, it is impossible for the panel to hit every mark the first time round Let us know what you think should be added! Thanks in advance – I am off to change my name in attempt to get off of Interpol’s watch list, which I am undoubtedly headlining after this article. Hey… at least I’m headlining something. Consider the floor OPEN! Thanks to our expert contributors: Matt Snyman Megan Snyman Martin Lampacher Mich the German Ed Gill Erdem Yucel Michnus Olivier Josh Smith Chris March Erich Rennspies And our various part-time consultants… A good few additions to the list were just put together by Jason and Lisa from Two Wheeled Nomad - give it a read! - 2 wheeled nomad1 point
 -
 It seems like with every thread concerning chain tension comes around, you see the same old answers. The majority of suggestions are given because a rider finds that their method seems to work for them. Actually, giving a person the recommendation to use the 3 finger method is quite silly. I mean, we all have different sized appendages, and 3 fingers for one may be 4 fingers for another. Also, when we have a chain tensioned correctly, there is a very fine line..and only about a 1/4 turn of the tension adjuster, to take the chain into way too tight. Providing pictures of your bike and claiming a person should tension it the same is crazy. The tensioning procedure is far to easily hosed up to simply look at someones picture and be able to make anything at all from it. I have studied the proper adjustment of chains and sprockets for years. I find that one of the biggest problems folks have is misinterpreting the manuals suggestions. For an example, the latest Yamaha 450 manual gives a check range of 1.9-2.6 inches from the back of the top chain slider to the bottom of the chain. After doing a check, I find that this measurement range is about right on. But, do you check this while the bike is on the ground, or while the bike is on the stand? And there lies one of the discrepancies I mentioned.... But where do these moto engineers get the proper recommendation for chain tension in the first place? They use standard engineering practice for chain tensioning...and they pass that textbook information along to the owner, taking into account the length of chain on that particular model bike. The engineering practice they use is the very same for each and every bike, but what changes is the numbers due to how long the chain is...or closer yet, to how long the distance between shafts is...which is what actually determines how taught a chain should be. If you were to use the engineering standard to tension your chain properly, you could then go back and check the measurements that the manual gave you. And you would find that they are indeed very close to what you found. But only if you interpreted what the manual was trying to convey to you properly. I see so many folks who will swear that stock OEM chains are nothing but cheap junk and should be shucked immediately. But that is not really fact. Yes, the OEM chain may not be the top shelf quality chain that your moto supply may want to sell you, but it is almost assuredly of a good quality that will last a rider for many rides before it is trash...IF the rider has it adjusted and maintained it properly. An improperly adjusted chain can only live so long..and even the high-dollar choices will be trash fast if they aren't properly mounted. I'd have to say that the biggest mistake I have seen over the years is folks having their chains too tight. When a chain that is too tight lands a jump and compresses the shock, the overly taught chain eats away at the sprocket teeth, the chain itself, wheel bearings, CS seals, and on and on.... SO many times a rider will then swear his stuff is crap, and start looking for harder and more robust equipment that can handle their improper adjustments better. I contend that if you properly adjust your equipment from the get-go, you will find that even the OEM equipment will provide many hours of riding. Your high dollar replacement equipment will also last longer. The Procedure: You first need to put the bike on the stand and remove your shock. Before you do anything, simply take the swing arm through it's motion of travel from top to bottom. This is the point where many are convinced something is amiss right away, as they often find that there is a point in that travel that the chain gets completely tight. Bowstring tight in many instances. This often will open a persons eyes who has thought they were tensioning their chain properly, but were in reality over tightening it. The tight spot will be when the CS, swing arm, and rear shaft are all in perfect alignment. When you have the bike in that position, you want to use a cargo strap around the seat and the rear wheel to hold the swing arm in that tightest position. Once you have the swing arm in the tightest position, you can then adjust the chain tension. The engineering standard for chain tension is to have between 1%-3% of the distance between the front and rear shafts in total up-and-down chain movement when the chain is at it's tightest point. For instance, if we have a bike that is 24" between the CS and rear shaft, the correct tension for the chain will be between .24" and .72" of total up-and-down free play of the chain when at it's tightest position. Knowing this measurement, you can initially adjust the chain to the .24" mark, and retention once you get to the .72" mark. If this is done, the chain will always be within the recommended tension rage, according to engineering standards. Some may find they feel more comfortable staying within the 2%-3% range. Let's assume you want to start out with the 2% mark and retention when you reach 3%. At 2% of total up-and-down free play would be .48" Note that the tension on the illustration shows the chain having .24" of free play when it is pushed down. And as such, it will also be able to move when pulled up by the same .24" This means that you have a total of .48" in total up-and-down free play in the chain. You are tensioned at the 2% mark. Once you have the tension proper, you want to make certain you still have proper alignment if the sprockets. When everything is nice and aligned, and you are satisfied that you have the proper tension on the chain, you want to make certain everything is buttoned up tight, and you can replace the shock. It is best to recheck everyting before you replace the shock, as things can change a bit on you once you have the adjusters and axle bolt tightened. Take the time to check and recheck until you have it spot on when tight. Once the bike is adjusted properly, and back in running condition...THEN you can check to see what that properly tensioned adjustment gives you when the bike is on the ground...or on the stand for that matter. What you want to do at this point is have some sort of reference so you can check the tension without going back through the shock removal procedure again. If you find that the properly tensioned adjustment gives you three fingers under the chain, behind the slider, when the bike is on the ground...then fine. Use that to determine if you are properly tensioned. But don't tell anyone else that is where they should have their adjustment, it simply may not be correct. To take this further, which is what I do whenever I get a new bike, is to first tension the chain at the upper limit of tension or the 3% mark. I then button everything up and check to see what measurement that gives me when the bike is on the stand. I can from then on see with an easy check when my chain reaches a point that it needs to be re-tensioned. I then go through the whole thing again adjusting the tension to the 1-2% mark, and recheck to see what measurement that gives me when the bike is on the stand. I now KNOW what measurement I should have for properly tensioned chain and chain that needs to be re-tensioned, when the bike is on the stand. I never have to go through the painstaking procedure of removing the shock to properly adjust for tension again. Some will actually cut a GO/NO GO block of wood or plastic to use as a gauge. And a proper gage block will have the distance of a properly adjusted chain on one side, and a larger measurement on the other side that will tell when the chain has gone further than the 3%. Many folks have gone for years improperly adjusting the tension on their chains. Many simply accept that their equipment wears out fast...and some find excuses for it like, the chain is junk, or their beastly bike simply is too much for the chain and sprockets to handle...but neither is the usually the case. The truth is that their tensioning procedure is placing undue stress on their equipment, and if they would take the time to do things a bit differently, they may well find that stuff starts lasting a lot longer.1 point
 -
 Why Instagram? So you want to use Instagram as an adventure rider? Great idea! Instagram isn't as big as Facebook but the demographics aren't as old, it's growing very rapidly (Facebook has plateaued) and most importantly the engagement rate is as much as 58 times higher than Facebook. We've been using Instagram for just over a year now and have reached the 41,000 mark (as of this writing) so we must be doing something right (we don't claim to be experts though). I haven't verified this 100% yet but we appear to be #1 on Instagram in the ADV space. There are a few gear manufacturers like Alpinestars and such with more followers than us but we are more media/community. We're much larger than ADVPulse Adventure Bike Rider and ADVMoto magazines combined. However, how you use Instagram will be very different than how we use it. About 20% of our content is original and 80% is reposted. "Anyone can copy and paste" you might say but we only share images of those who tag us. If someone gives us a shout out then I'm going to return the favor if it's a good image. That's community right there. I'm also looking for elements you'll learn more about further down like composition and a story or quote to accompany the image. There's another account that does nothing but share images; it seems the most popular images he can find, but he's a third smaller than us with twice as many posts it took to get there. We passed them a long time ago. We also try to direct traffic to this online forum and I'll periodically talk about an article, review or interesting how-to piece. I also use Instagram to give shouts out to the sponsors of our project bike. If you have a personal account already that's fine but consider setting up an adv-specific one if you plan on using it extensively and perhaps to attract new or reinforce current sponsors. Instagram has made it easy now to toggle back and forth between multiple accounts in their app. Hashtags Hashtags? Sure, but don't go overboard. Here are some category type ones : #xladv (of course!) #advrider #dualsport. Many companies have their own hashtags they promote and try to own, like #nodirtnoglory (ADV Addicts), #makelifearide and #rideandshare (BMW Motorrad), #readytorace (KTM) or #sizematters (XLADV). Hashtags help your photos get found by others. The most common hashtags I've used/reposted: advrider, bmwmotorrad, adventure, dualsport, motorcycle, adv, enduro, makelifearide, ktm, advaddicts, moto, bmw, offroad, advlife, travel, dualsportlife, r1200gs, touratech, rideandshare, motorrad, wanderlust, bmwgs, sizematters, nodirtnoglory, motolife, etc... Some hashtags bug me. #whyweride I don't like because that documentary film never featured any adventure motorcyclists yet they use us to market their film by sharing photos of us and in many cases do NOT attribute credit. They've been caught many times and still do it after photographers have told them they may not use their photos. I'm also growing a bit tired of BMW's #makelifearide and #rideandshare because they aren't readily associated with solely BMW (like #unstoppable) and I think they kind of take credit for the popularity of its use when it's by riders who have no idea it's BMW's. However they are a good way to get noticed by that company if that is your goal. I regularly search for the latest #xladv hashtags to see which photos I want to re-post. Some still baffle me like #rideandwander. That's an actual account but it's kind of taken on a life of it's own and people use I guess because they like it. Just remember not to over do it. Feature your sponsored gear If you have some gear that's been sponsored then give that manufacturer/vendor a shout out with a tag so it will be easier for them to find it and be found by others. Many times I have searched for a tag hoping to find a photo/story of someone using that product. Make it a point to photograph or video the sponsored item so people can see it up close and see how it's used. Text Field Your post ideally should have the first 155 characters be text (because that's what's seen in feeds). Have something to say! Instead of "rode some trails today," tell a story or give an inspirational quote. Pikipiki_overland_blog does a great job of storytelling and Sjiriki_Jess does really well with the quotes. Chickamotorunner and FeralCat2Wheels are also doing a great job with the stories recently. Try to engage your followers (remember Instagram is 58 times more engaging than Facebook). Ask a question. But also monitor your responses. Instagram doesn't do a good job of making it easy to track so be sure to look at past photos you've posted to answer any questions, delete offensive comments or report spam posts. Tools like Iconosquare can help you there. Put your hashtags after the text or consider even posting your hashtags in the first comment after you've posted the photo. That keeps it cleaner but you risk losing those hashtags when someone re-posts your photo. You can put a short link in but they don't work well. It's best to say "see link in profile" and put a link there that you want people to click on. XLADV Content: Photos This photos is our most liked at XLADV. It's received over 7,000 likes! For content, I'd say what works best is pretty simple: photos of your bike! (insert photo that has gotten the most likes on xladv) Look at the like counts for our account and you'll quickly start to see a pattern. People want to see a bike either just sitting there looking awesome or doing something awesome like on the ground, in the air or on a bridge or narrow path. Put yourself in there too but let's see your face and see you smile/laugh. Landscape photos might look good on a big screen but without a bike in it, they're useless. Don't forget most are viewing on their smartphones. Photos are posted in Instagram's own square format so give some thought to how you frame your photos. You can add a filter effect but not a lot of people use that anymore. You can also put up a grid of multiple photos. MichelDelCourt does photos very well. It helps to start as a good photographer but it's not hard to simply look at popular adventure riders to see how they are composing their photos. Think about the elements they choose like a road, bridge, rut, mud puddle, etc... Think about the time of day for their photos; most likely in the morning or evening when you have the best light and not mid-day. You may also want to consider watermarking your photos with a logo of some kind given how many like to "borrow" them. I use iWatermark for that. XLADV Content: Video Video works well too, especially video with music. Instagram recently extended the limit of video from 15 seconds to 1 minute. But try to avoid the boring helmet cam footage of you riding down some highway; it's just not that interesting. I think the one post of ours with the most views (about 65K) is the one of KatePeckMe lifting up her R1200 GS Adventure at a training camp. It helps to be a thin beautiful model too! When you post a video you can choose the initial image so do that instead of putting up a video that has a black image. Why would anyone click on that? Which XLADV accounts to follow? Find a few accounts you like and then go through who they follow. You can click on "follow" right there. If you'd like to get someone's attention, consider tagging them in a photo (different from using a hashtag) but don't do it too much because it can get annoying. It's best not to message someone asking them to repost your photo. Just use their tags for awhile as well as like and comment on their posts and if they don't follow you/repost your stuff, move on. Easier to work with those who want to Chances are you will find "Instagram buddies" where you may like and repost each others' stuff. If someone reposts your photo then thank them and then share one of theirs. You will find a lot of new friends that way and it will matter less if that one account you are after isn't following you. I use the Repost app and have seen the Regram app but that seems to be available only outside the US. XLADV is a unique type of account that uses Repost a lot but you may not ever use it yourself. When you have such great content like Great_World_Trek then you don't have to bother Don't even think of buying followers. That's just cheezy and pointless. There are however a few tools out there that can kind of assist you in gaining likes and followers in a pseudo-organic way. I tried Instagress for a few days and could see how that can help someone looking to gain followers. What it does is you program it to automatically like and/or comment on photos with certain hashtags, certain accounts, etc... Those people think you're actually following them so be sure you're on top of it should they respond to your comment. It can be easy to spot when you see someone commenting with the same thumbs up icon on accounts they're not even following. We already gain a few hundred followers a day so it wasn't something I really needed to do after the three day trial but I know a handful of accounts who've used it to great success. One went from a few hundred followers to over 10,000 in two months! Organic is best though. Make sure your Instagram account is listed on your website/blog (if you have one) and/or your other social media channels so people can find you. Seeking Sponsors So you've become an expert in adventure motorcycle use of Instagram and have a huge following! Congratulations! That's an end unto itself but it's also handy if your aim to to seek sponsorship. If I'm a gear manufacturer then I know I need to sponsor riders to get the word out about my product. I'm going to have a budget and will want to choose riders who already have a solid presence on Instagram (and FB, YouTube, etc...). I'd want someone who takes good photos, tells a story and has a following. Your strong following will help you command better sponsorship agreements and perhaps even cash on top of free product. Consider that product that retails for $400 may only cost them $200 or less and you're essentially going to give them free exposure indefinitely? Stay tuned for more articles like this. I'll be covering How to Facebook, Google+, etc... in the near future. How to gain sponsors and negotiate contracts is something I'll be presenting at Horizons Unlimited Yosemite this fall.1 point
 -
 I know that there are purpose built, slick siphoning kits that you can buy that allow you to transfer fuel bike-to-bike, but here's a cheap & effective alternative for your DIY'ers. Note: if your fuel tank has a screen in the filler cap hole that is not removable, this technique will not work as the donor bike. Materials List 1. Fuel line hose (I prefer clear). 2. A small shop rag. You'll need to make two lines; one long enough to reach from bike-to-bike, all the way to the bottom of the fuel tank on the donor bike. 4-5' is should be sufficient. The other hose only needs to be about 1.5' long. How to Use 1. Insert one end of the longer hose into each motorcycle gas tank. 2. Insert the shorter hose into the tank of the donor bike. It does not need to be deep into the tank. A few inches is adequate. 3. Use the small shop towel to create a seal around the two hoses that have been inserted into the donor bike's tank at the tank's filler hole rim. 4. With your hand securing the towel to maintain a seal, blow strongly into the shorter hose. This will create positive pressure into the donor bike's fuel tank, forcing fuel to escape to the recipient motorcycle. You may have to plug the hole with your tongue and blow more than once to get the fuel to being flowing. Once the fuel beings to flow, it will continue to do so because of the vacuum that you've created. However, gravity is in effect, so the further the recipient tank is below the donor tank the better. To stop the flow, simply remove the long line from contact with the fuel on the donor bike. This kit is cheap to make, easy to use & store, and best of all, no risk of fuel coming in contact with your mouth.1 point
 -
 I had blown one of my auxiliary driving lights because I had gotten in the habit of just leaving them on all the time. As soon as I turned the ignition on they turned on, and in turn were subjected to the power fluctuations of engine start since they were wired to an ignition switched source. I needed a solution to prevent this from happening - enter the PDM 60. The PDM 60 gave me the ability to not only eliminate fuses and relays, but create on and off delays for the outputs. Take a look at Rowe Electronic’s PDM 60 programming manual and Quick Start Guide and you can see that there is a lot of flexibility in the delays and circuit trigger options. My only complaint is that the “Delay On” timer, if used, applies to all circuits regardless of the mode selected, and the “Delay Off” timer applies to all circuits selected for delay off - you cannot have a different delay on or off per circuit, so you have to compromise a bit - at least in my case I did. There are other products out there that provide a similar solution, but the PDM 60 seemed to be the least over-done - I like to keep things simple, silly, stupid as much as possible. In this application I was going to use three of the six available outputs. This may give you some ideas on how you want your own setup to function, and get the creative thoughts flowing. Output 1 - Garmin Montana GPS Ignition trigger. 15 second startup delay and 30 seconds shutoff delay limited at 2 amps Output stays on for 30 seconds after ignition off (not engine kill). Garmin products automatically shutoff 30 seconds after external power is lost unless you tell them not to at which point they switch to the internal battery. This gives me time to poke at the GPS after I turn off the bike, or just let it shut off automatically after 60 seconds. Output 2 - Driving Lights Ignition & Ground trigger. 15 second startup delay limited at 4 amps I am using a handlebar mounted switch to provide the ground trigger. This way I can still turn the lights on and off when the ignition is on. If I leave the switch on indefinitely, the lights simply turn on 15 seconds after I turn on the ignition and turn off when I turn off the ignition. A review of that switch can be found here Output shuts off immediately when ignition is shut off regardless of handlebar switch position. If I use the kill switch rather than the ignition to shut down the bike the lights stay on if the switch is on. Output 3 - Coil of slave ABS Disable Relay - See detailed article on this topic here Ignition Trigger. 15 second startup delay limited at 2 amps. I am using a handlebar mounted switch to provide a ground to one side of an ABS disable relay’s coil. The PDM 60 provides the 12VDC to the other side of the coil. Yes, I could have used the PDM 60 to control the ABS disable without a relay, but as I needed to switch a 30 Amp circuit I chose to use a slave relay. A review of the handlebar mounted switch can be found here Output shuts off immediately when ignition is shut off. If I use the kill switch rather than the ignition to shut down, the ABS disconnect relay remains active. If I leave the ABS disable switch on indefinitely the ABS automatically disables 15 seconds after ignition on. I went with a 15 second startup delay to allow the ECU to complete it’s startup, and for bike startup. 15 seconds after the ignition is switched on all outputs turn on except those selected for ignition & ground trigger, and those selected as inactive. WARNING: There is a blurb in the manual that I almost missed. DO NOT attempt to program your PDM 60 while its 12VDC input is connected. According to the manual this can damage the unit. I had mine completely wired up, went to program, and was glad I read ahead or I may have killed the PDM 60. WARNING: Pay special attention to how you plug in the programming cable. It will plug in in two different directions. One direction programs the PDM 60, the other direction destroys the PDM 60. There is a warning to this effect in the manual as well, but take your time making sure you orient the programming lead correctly. NOTE: As per the programming manual you will need Microsoft’s .NET framework version 4 installed on the programming laptop/pc. The programmer installation file installs the USB drivers you’ll need for the programming cable. Once installed the programmer is very easy to use. Yamaha Super Tenere Specific: On the Yamaha Super Tenere the easiest and cleanest place to get your ground reference and ignition trigger is the stock aux lighting wire harness which is likely unused on your bike. This wiring harness is located under the lower right cover near the stock toolkit location. Connectors and rubber seals for this plug can be sourced from your friendly Yamaha dealer and cost less than a dollar if not free. There are two plugs/harnesses stashed just to the left of the stock toolkit location. One is triangular and has three connections that don’t go anywhere, and one is square and has four connections that don’t go anywhere. Take the male side of the, white, three connection plug down to your Yamaha dealer and ask for the connectors and rubber seals needed to complete the male side of this plug. (The four connector plug is for Yamaha accessory grip heaters). You can find a detailed writeup on how to utilize this plug within my ABS Disable Switch Article about half way down I mounted my PDM 60 in the lower part of the electronics bay just behind the stock toolkit location. All my wiring and terminal strip is located in the stock toolkit’s location. I got rid of that useless piece of kit long ago, and created my own toolkit which I keep in my panniers. I made a mounting plate for the PDM 60 out of some 1/4” acrylic sheet (), bolted the PDM to the mounting plate, and used velcro to affix the PDM and mounting plate to the flat spot in the electronics bay. I used a 12 point terminal strip for all my connections to keep everything nice and tidy. For wire routing to the driving lights and GPS I went up under the upper right side cover, through an existing wiring chase, and to the lights/GPS wrapping everything in heat shrink tubing. Pictures speak 1,000 words - see pictures below for reference. Want to know what others think about this product or want to share your experience? Checkout our Reviews.1 point
This leaderboard is set to Los Angeles/GMT-07:00